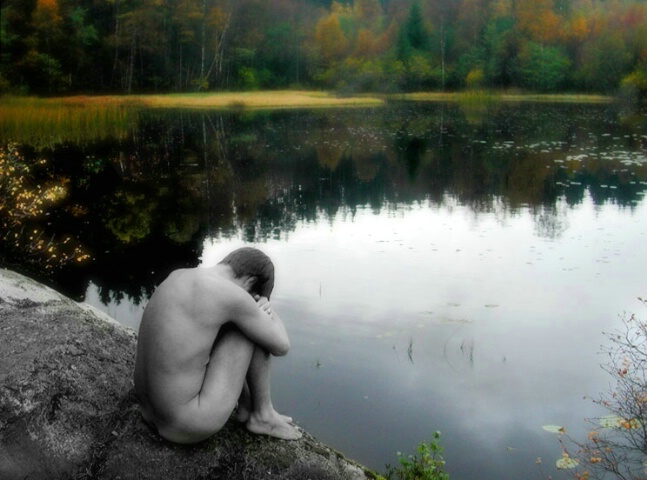
Sadness

Uploaded: October 06, 2001 21:36:28
Nikon Coolpix 880, Partly desaturated in PS
Christie E. Kleinert October 10, 2001 0
I've only been taking photos with an SLR since last December...how did you get this amazing shot with b&w and the color. Truly incredible images! #1118Trine Sirnes October 23, 2001 0
Thank you Christie! I used Photoshop, selected those parts I wanted in b&w and desaturated them.;-)Trine #2075
Piper Lehman November 28, 2001 0
This is fantabulous, Trine. I'll have to try your technique in PS. I haven't been successful with layers so far, and when I try to simply pinpoint a section to change, it always LOOKS like I've done just that--with lines around the section. Any advice? #3180Trine Sirnes November 28, 2001 0
Hi Piper!Here's a couple of ways to change just a selection:
Without using layers: select the area you want to change, either by "magic wand" or "lasso tool". When you got your selection, go to Select-> feather and choose an amount here. The feather tool "washes out" the transition area between your selected area and the rest of the photo, so you don't get that obvious differense between the different selections. The more feather you choose, the more "floating" you will get the effect. As for large photos I usually use an amount to about 35, but you just have to try it out on your photo, and see what gives the best result.
Whith layers: If you have a, let's say a portrait on a background you want to change, you will often have a sharp silouette where the face meets the background. Using a big feather here for i.e blurring the background, will cause bluring of the lines of the face too. To prevent this, choose the whole face, or the whole background and go to Layer->New->Layer via copy. Then you will get your chosen selection as a new layer, and can change this as you want, without this having any effect on the rest of the photo. Then, when your done with your changes, you can use layer->matting->defringe to make the transition a bit smother, but just with a small amount.
It's not easy giving absolute advice, because this is learned by trying. Most of my explaination is for me done different each time, and most of it is being combined. As using layers also often make me use the feather tool before I use layer via copy, to smothen the transition area. But as I said, it all depends on the photo, and how you want the final result.
I hope this helped a bit(it's not easy for a norwegian to explain everything in an understandable way in english;-)
If you have more questions, please feel free to ask.
;-)Trine #3198
Sign up for an interactive online photography course to get critiques on your photos.
Discussions by Category: You can view photo discussions on various themes in the Community > Photo Discussions section of the site.
BetterPhoto Websites: If you see an orange website link directly under the photographer's name, it's totally okay. It's not spam. The reason: BetterPhoto is the one that offers these personal photography websites. We are supporting our clients with those links.
Unavailable EXIF: If there is no other information but 'Unavailable' in the EXIF (meaning no EXIF data exists with the photo), the 'Unavailable' blurb is not displayed. If there is any info, it shows. Many photos have the EXIF stripped out when people modify the image and resave it, before uploading.
The following truth is one of the core philosophies of BetterPhoto:
I hear, I forget.
I see, I remember.
I do, I understand.
You learn by doing. Take your next online photography class.
Copyright for this photo belongs solely to Trine Sirnes.
Images may not be copied, downloaded, or used in any way without the expressed, written permission of the photographer.
Log in to follow or message this photographer or report this photo.

I already have an account!
