|
David Allen |
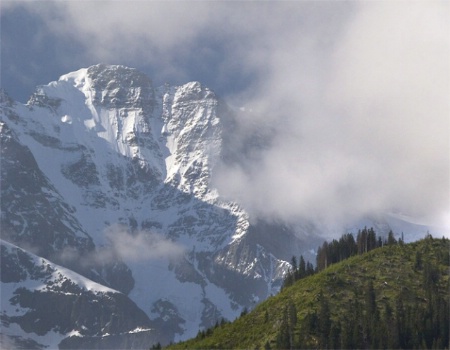
Snowy Mountaintop Vs. Dark Foreground I am about to go to the Himalayas for the second time. The first time I struggled to get a good early-morning shot of the sun just catching the top of the mountains, when I also wanted the lodge or the valley in the foreground. Basically, the mountains were burnt out and/or the valleys were too dark. Do you think I should use a grad filter and, if so, which is best?
|
||||||||||
|
|
|||||||||||
|
Andrew Laverghetta |
Did you happen to catch what the exposure difference was between the shaded area and the lit mountain top? I'm sure the graduated neutral density filter would help a lot if you can get one that will allow enough stops difference between the top and bottom - that is, unless you are willing to do this digitally. You could take two separate pictures metered for the highlights and the lowlights. If it were me, I would leave the feeling of shadow and highlight there, because they are different color temperatures. See what Shadow/Highlight will do in Photoshop (if you have it) under Images>Adjustments. Again, if you can frame the image correctly with the filter split down the middle, go with that. If not, take two separate exposures metered for the shadow and sunlit peaks and put them together in an image editing program. Hope this helps!
|
||||||||||
|
|
|||||||||||
|
David Allen |
Thanks Andrew. I am a bit of a newbee at photography and on a steep and fast learning curve. Yes I did improve my shots with Shadow/highlight but still lost a lot on the mountain tops. I will have a go at taking two seperate shots and then see if I can put them together. My wife thought I needed an other outdoor hobby but I spend more time on the computer than with the camera.....
|
||||||||||
|
|
|||||||||||
|
Andrew Laverghetta |
If it was your wife's choice, maybe you should see what you can do with the filter since that will keep you out there a little longer lol.
|
||||||||||
|
|
|||||||||||
|
Maria Melnyk |
Rather than spending all that time putting 2 shots together, it's easier and quicker to use a grad ND filter instead. (You can still take the 2 separate shots as a back-up plan.) With mountains you need a soft grad as opposed to a hard grad. If you use a square Cokin filter and not a round one you will be able to move the filter up and down in the holder to position it exactly where you need it.
|
||||||||||
|
|
|||||||||||
|
Kevin Elliott |
ND grads are good - if you can hide the transition. Can be next to impossible in mountains. Another idea is to use a polarising filter. This will bring the sky down by 1 stop in relation to the rest of the scene. For this to work best the sun needs to be to the side of the subject. Make sure that you get teh right sort for your camera, most require circular polarisers these days, but you can save a lot buying a linear one if it's OK for the camera. If you're not digital, I'd use a slow lower contrast (iso 100) fine grain print film with the camera on a tripod, there's a much wider exposure range on neg film, but you'll need to scan to get the most out of it - lab printing doesn't usually do it justice. Suggest you meter off the brightest point, then overexpose it by 1-2 stops from there. Bracket, it's an expensive shot to lose.
|
||||||||||
|
|
|||||||||||
|
Dan Fogelberg |
Here's one way to do it: After opening the image in PS, duplicate the background layer by dragging it down to the New Layer icon. Lighten the image using Levels until the dark foreground looks correct (the highlights will wash out, but don't worry, you'll get them back). With the lightened image still visible, click on the Mask icon (white circle in grey rectangle) at the bottom of the layers palette. Type "B" to select the brush tool and slide the hardness to 0 and the diameter to get the stroke coverage you need. Hit "D" so that black and white are your default colors at the bottom of your toolbar. Click on the double arrow to toggle the boxes so the black overlaps the white to make black the foreground color. Now, apply the brush to the areas that are too light, and you will see the darker layer reappearing. You can adjust the opacity of the brush and make very subtle changes as you brush in the layer. Sometimes you'll need to reduce the brush diameter for the very edges of your adjustment area. Of course, for this to work, you'll need enough information recorded in the lighter parts of your subject, so it generally works best if the original is a bit underexposed, but I've found that this technique is easier to manage than complex selections using tools like the magic wand. Plus, it's fun.
|
||||||||||
|
|
|||||||||||
|
Dan Fogelberg |
|
||||||||||
|
|
|||||||||||
|
This old forum is now archived. Use improved Forum here
Report this Thread |
|||||||||||