To discuss a photo, sign up as a BetterPhoto member or log in.
4!
|
|||||||||||
|
|
|||||||||||
|
Gena L. Talbot |
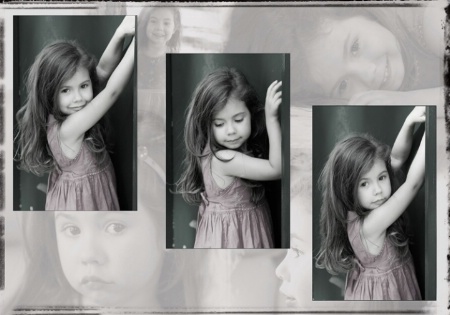
Amanda, I absolutely love this image creation that you have made. I would love to know how you made such a beautiful display? Please give a little hint! lol lol You have EXCEPTIONALLY BEAUTIFUL images throughout your gallery. You do such awesome work! Congrats on being such a great photographer! :)
|
||||||||||
|
|
|||||||||||
|
BetterPhoto Member |
I agree! This is wonderful. One of the nicest collage I have seen yet.
|
||||||||||
|
|
|||||||||||
|
Amanda E. Radovic |
Thanks Gena and Trula. Here is how I did it. It is very long and involved but if you do it step by step it'll come together. I started with full colour files - the desaturation comes at the end ok! - I opened the 3 main pics of the little girl, duplicated them (choose Image from the top toolbar and select duplicate in the drop down menu) and adjusted them so they were all similar and full colour. Then I put a small black border around each of them by doing the following...
|
||||||||||
|
|
|||||||||||
|
Amanda E. Radovic |
HERE IS THE REST!!! - In the layer palette there will be a box with 'normal' in it. If you hit the down arrow a drop down menu of layerstyles will show. Select Luminosity for these images and adjust the Opacity and Fill sliders of each layer till you get the transparancy you desire. - To soften the edges so that they seem to merge I simply add a mask to each layer by highlighting each layer one at a time and clicking on the 'circle inside a rectangle' at the bottom of the layers palette. Then I chose a large soft natural brush. Set the opacity to about 30% and brushed away the hard edges. - When happy with the image then click Layer>flatten and save. -The rough painting look around the image is an effect from Autofx Photographic Edges plug in filter. I hope this helps and that I haven't forgotten anything. Perhaps print this up so you can work from a hard copy. Have fun :-)
|
||||||||||
|
|
|||||||||||
|
Amanda E. Radovic |
oH YEAH!!! I did forget something. I then at the very end desaturated the whole lot. Shift,ctrl,U for desaturate then Shift, Ctrl F for fade then adjust the slider till you get the saturation you like. Bye!
|
||||||||||
|
|
|||||||||||
|
Gena L. Talbot |
(((((AMANDA))))) What great instructions you gave. WOW I am amazed on how easy it was to follow them. You are such a great person to help out like that. I can't wait to put that into great use. THANK YOU, THANK YOU, THANK YOU!!!! :)
|
||||||||||
|
|
|||||||||||
|
Amanda E. Radovic |
My pleasure Gena. I think that Photoshop is such an overwhelming application sometimes that step by step insturctions are helpful. You can then have a play around with different effects to your own liking. You'll have to send me a link when you upload a montage of your own :-)
|
||||||||||
|
|
|||||||||||
|
Julie Lee |
Hi Amanda, What photoshop program did you use to do this? I have elements 4.0, and was not able to follow some of the steps because I couldn't find them in 4.0 Thanks, I think all of your photos are fantastic! Julie
|
||||||||||
|
|
|||||||||||
|
Amanda E. Radovic |
Hi Julie, I am running CS2 - I'm not sure what steps Elements 4 doesn't have (I know it doesn't have curves) - probably smart objects as they were new to cs2.
|
||||||||||
|
|
|||||||||||
|
Julie Lee |
Hey Amanda, Thanks for responding. Yep, that's one of the things I couldn't find. You gave such good instructions though, I was able to create something similar. I don't think element has the "circle inside a rectangle" that you mentioned, so my hard edges are still visible, I used the eraser tool and a soft edged brush to try to brush the edges away, didn't work very well, I'll have to try something else.. Elements doesn't have the Fade slider either, I don't think so anyway. I'm sorta new at this :)
|
||||||||||
|
|
|||||||||||
|
Amanda E. Radovic |
when you make your selection (the circle), try right clicking inside the selection which will bring up some options. Choose feather and enter between 100-250 pixels, depending on how large your image. You'll also have an inverse selection option which is handy if you want to vignette your edges. Try shift ctrl F - if elements has fade then that shortcut will bring it up.
|
||||||||||
|
|
|||||||||||
- Carlton Ward Contact Carlton Ward Carlton Ward's Gallery |
Thank you Amanda, Great instructions and such a beautiful work of art you have created. I was just trying to do something similar and knew I was missing a couple of steps. Now that you have filled in the gaps for me, I will try again. Happy Holidays
|
||||||||||
|
|
|||||||||||
| Log in or sign up to respond or interact. | |||||||||||