To discuss a photo, sign up as a BetterPhoto member or log in.
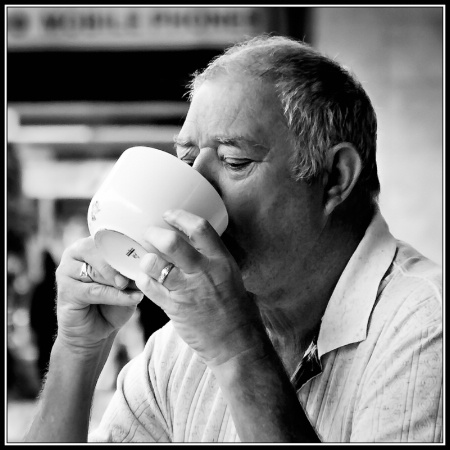
THIS is a Cup of Coffee!
|
|||||||||||
|
|
|||||||||||
|
Arthur Bohlmann |
Another great portait, awsome subject and editing
|
||||||||||
|
|
|||||||||||
|
Dennis Gay |
Happy days ARTHUR! Great to have you at my table at the Crèma again. Thank you so much for your great wrap mate. GB
|
||||||||||
|
|
|||||||||||
|
Dennis Gay |
Welcome to the Crèma Mr EDITOR!!!!! Lots of coffee flavoured thanks for awarding this caffeine addict a PICK! GB
|
||||||||||
|
|
|||||||||||
- David Resnikoff Contact David Resnikoff David Resnikoff's Gallery |
Well deserved caffeine Awarded Pick. You are really mastering candid Portraits Mate Well done David R
|
||||||||||
|
|
|||||||||||
|
Dennis Gay |
Bon Jour DAVID! Welcome back to the Crèma amigo. A shed full of thanks for the terrific feedback. I must admit I thoroughly enjoy my candid photography. GB
|
||||||||||
|
|
|||||||||||
|
Wendy M. Hansen-Penman |
The tonality of this shot is In-credible! You are a true black & white artist, Dennis! Do you shoot in black & white? What kind of editing do you do to get those tones and contrast? Or are you just THAT good?!
|
||||||||||
|
|
|||||||||||
|
Dennis Gay |
Woohoo WENDY! Glad to have you with me at the Crèma again. Major thanks for your most flattering, encouraging and inspiring comments. Oh I'm just THAT good. LOL No. All my knowledge and expertise comes from experience, study, experimentation, Lightroom and Photoshop. First I like to make an image that is a little higher in contrast than the norm, mainly by using under exposure and then I apply this conversion with lots of tweaks depending on the image and how I wish to present it: My favourite and most used method. It's all about the light. 1. Carry out normal processing of image in Photoshop (PS) or Lightroom (LR) and save. This ensures you have a colour version on file 'just in case'. 2. LOad a COPY of that file into PS and Save As 'same file name with b&w at the end of file name'. 3. Go To -> Image menu -> Mode -> Lab Colour. 4. Go To -> Channels Palette 5. Click on Channel 'a', hold dwn Shift Key and click on Channel 'b' to highlight both channels. 6. With cursor over 'a' or 'b' channel, right click mouse and select Delete Channel. 7. Hold down the Ctrl key and hit the 'S' key to save. 8. Go To -> Image menu -> Greyscale. 9. Hit Ctrl/S to save. 10. Go To -> Image menu - RGB Colour. 11. Hold down the Ctrl key and hit the 'S' key to save. 12. Go To -> Layer menu -> Duplicate Layer -> OK. 13. Hit Ctrl/M to bring up Curves box. 14. Click on bottom left end of diagonal line and move to right to adjust blacks. 15. Click on centre of diagonal line and move down to adjust mid-tones. 16. Click on centre of lower half of diagonal and move down to adjust dark tones. 17. Click on centre of upper half of diagonal and move up to adjust highlights. Note: Movement of diagonal adjustments best done by clicking on diagonal and using Arrow keys. 18. Go To -> Layer menu -> Flatten Layers. 19. Hold down the Ctrl key and hit the 'S' key to save. 20. Go To -> Image menu -> Mode -> Lab Colour. 21. Go To -> Layer menu -> Duplicate Layer -> OK. 22. Go To -> Filter menu -> Unsharpen Mask. 23. Set Amount from 10-20%, Radius to 50 pixels and Threshold to 0 -> OK. GB and good luck.
|
||||||||||
|
|
|||||||||||
|
Kim Andelkovic |
Great B & W portrait Dennis :-)
|
||||||||||
|
|
|||||||||||
|
Dennis Gay |
Glory be KIM! Always a seat for you at the Crèma. Glad you made it. Muchas thanks for your great wrap. GB
|
||||||||||
|
|
|||||||||||
- Rita K. Connell Contact Rita K. Connell Rita K. Connell's Gallery |
another great capture...love how big the mug is. thanks for the info
|
||||||||||
|
|
|||||||||||
|
Dennis Gay |
Sweeeeet as Rita! So nice of you to drop by the Crèma for a coffee and some people spotting. Maximus thankus for your stimulating feedback. The info is my pleasure to give. GB
|
||||||||||
|
|
|||||||||||
| Log in or sign up to respond or interact. | |||||||||||