|
Paul M |
Compensating for Vignetting in Negative Scans
Virtually all of the outdoor shots have noticeable vignetting, i.e. the image is relatively bright in the middle and gets darker as it radiates out. Does anyone know how I can at least partially compensate for this through Photoshop? Any advice would be appreciated.
|
||||||||||
|
|
|||||||||||
|
Paul M |
Come on... you brainy photographers must have SOME ideas about what I can do?
|
||||||||||
|
|
|||||||||||
|
John Wright |
Paul, It's a tough one. I would think that there might be a couple of options to "improve", but not correct the vignetting. Have you tried modifying the levels and doing some color balancing in PS? If you have PS CS, you might also try the new Shadow/Highlight tool that's included. Those are the only things that come to mind. Hope that helps...
|
||||||||||
|
|
|||||||||||
|
Paul M |
Thanks for your answer... I have played with levels etc, but it hasn't done much. and I don't have CS yet. I tried using the dodge and burn tools but the results were too uneven. What I was wondering was whether I could use some kind of a semi-transparent mask layer that fades out as it moves towards the outer edge. I'm not sure how to try something like that. I don't expect the end result to be perfect... just better. Thanks.
|
||||||||||
|
|
|||||||||||
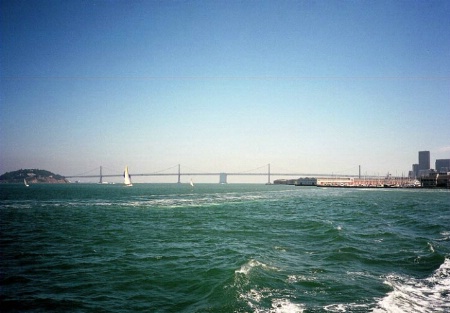
StoneHorseStudios.com - Eric Highfield Contact Eric Highfield Eric Highfield's Gallery |
There are a number of techniques you can try, which will reduce it, but it will be a long process, so you may want to focus only on the images that you most cherish. Here goes: For the above photo, I basically drew a selection of one the darker corner areas with the Lasso tool, and then feathered the selection, and adjusted the Brightness/Contrast and saturation levels just for that section. I then repeated it for each other corner. Anything I couldn't fix by this method I attempted to clone out with less extreme sections of the photo using the Clone Stamp. I then selected all of the sky with the Magic Wand tool, feathered it, and adjusted the Brightness/Contrast and Saturation levels just for the sky. With just the sky still selected I applied a bit of Gaussian Blur to hide grain, dust and any dirt on the slide that was picked up in the scan. I then inverted the selection to select everything except the sky, adjusted the Brightness/Contrast and Saturation levels for there. Finally, I made the level adjustments to the entire image, and then used a bit of UnsharpMask to compensate for the softness of the scan and/or compression, saved, and that was it. Hope this Helps. Regards, Eric.
|
||||||||||
|
|
|||||||||||
|
Paul M |
Thank you. It's complicated but it (obviously) works. I agree that it will only be good for a few of the better photos. Thanks again!
|
||||||||||
|
|
|||||||||||
|
This old forum is now archived. Use improved Forum here
Report this Thread |
|||||||||||