
Marcus T. Hokama |
|
Photo editing help
is there a way for me to put a picture of my face or another object inside of the water drops on this photo? http://betterphoto.com/gallery/dynoGallDetail.php?photoID=269213&catID=560&style=&contestCatID=4 I have Jsac paint shop pro 7 and 8 and adobe photo shop 7. thanks
January 20, 2004
|
|
|
Peter P. La Rosa |
|
Marcus, Sned me a photo of your face, I'll tyr it out! LOL
Pete
February 16, 2004
|
|
|
Marla Drayton |
|
Sure, In Photoshop, the easiest way is to place your face as a separate layer on your photo and then use a layer mask to blend in the face with the water droplet and add some trasparency. Use the luminosity filter if you would like your face to pick up the colors of your photo underneath. What is your level of experience with Photoshop? If you've never used layer masks before, let me know and I can give you more detail.
February 17, 2004
|
|
|
Marcus T. Hokama |
|
Marla, can you please give me more detail. I am a 17 year old who loves photography and lean something new as I want to do something new. thank you.
February 17, 2004
|
|
|
Nik's Pics |
|
Hi. I'm having the same problem, trying to learn Photoshop along with my ideas. Everyone that has learned Photoshop seems to love it and think it's the easiest software, but the books I read on it are a little over my head. Does anyone know of a book or website that gives Photoshop steps in more detail? I'm also trying to do the same type of thing like Marcus with the water drops... along with my other ideas. Thanks.
February 18, 2004
|
|
|
Marla Drayton |
|
Hi Marcus, One thing you will want to do is get used to the layers palette. Go to WINDOWS and select LAYERS from the drop down menu. First I will explain the layers palette. I'm not sure what you know and don't know, so please bear with me if you already know some of this. On the bottom of the Layers palette you will see some icons. An "f" in a circle, a box with a cirle in it, a folder, 1/2 black 1/2 white circle, a page symbol, and a trash can. The "f" activates the LAYER STYLE menu. It is active only when you have a layer that is not locked. When you open an image in photoshop, the default is that your image will be in a locked background layer. If you double click on it you can unlock that layer. That will allow you to use the Layer Style menu. You'll want to experiment with this menu. It's especially great for adding dimension to text and other objects. Drop shadows, bevels, shading, etc... The second icon, the box with the circle in it is the layer mask button. You'll use this to create masks on your image. This is a very powerful tool as it allows you to "cut away" parts of your image without actually destroying your image. If you don't like the "cutout" then you can undo the mask and start over. The Folder button allows you to group layers together. If you work with a lot of layers like I do, this can be a very useful tool. The black and white circle is your adjustment layer button. This allows you to apply different settings to your image without permanently changing your image. If you don't like the changes you've made to the exposure or contrast or whatever change you made to the image, you simply double click on the adjustment layer and change it, or you throw it away and your image will be reset back to the original. The paper icon allows you to create a new layer. The trash can is pretty self explanitory. Just drag any layers in the trash to delete that layer. Ok, now we're ready to begin... see my next post.
February 18, 2004
|
|
|
Marla Drayton |
|
First thing to do is open up the file with your face or whatever object you want to put inside your water droplet. Use your marquee from the toolbox menu to select your face and copy it. Paste your face onto your water droplet picture. When you do this it will automatically place it in a separate layer. Resize your face and position it over the water droplet. Use "Control" "T" to activate the TRANSFORM command to allow you to resize the object. Hold the shift key down and drag by one of the corners to resize the face proportionately. Make sure the layer with the face is selected. It will be hilighted. Click on the adjustment layer button - 2nd button, the square with the circle in it. It will then place a white box next to the tiny picture of your face in the layers palette. It has a little lock symbol in between the two. The white box is your adjustment layer. If you click on that box, you can paint in it to cut away parts of your image without actually erasing parts of your image. Try it. Select your brush in the toolbox and paint in the white box. Wherever you paint with black, your image will become transparent. Wherever it remains white, your image will show thru. Ok, now you'll throw away that mask and start again. Click on the layer mask and drag it to the trash. It will ask you if you want to apply the mask before trashing it. Click on discard because you don't want to apply that mask. Click on the layer mask button again to make a new layer mask. Select your circle marquee and draw a circle around your image. If you position the circle wrong, hold down the space bar as you are drawing to reposition the cicle. Hold down the shift key as you are drawing to make a perfect circle. Feather the selection. Control-Alt-D and pick a value. The higher the number the softer the edge of your circle will be. Now you'll want to inverse the selection. Control-Shift-I to inverse. Now click on the white box in the layers palette to make sure the layer mask is selected. Go to EDIT and FILL and fill with black. Your face should now be in a circle. If the circle doesn't look soft enough, you can soften it even more by blurring your layer mask. Deselect and go to FILTER - BLUR - GAUSSIAN BLUR and slide the level until you think the circle edge is soft enough. You can then use the paint brush to paint more of the image. Say there is some background behind your face that you want to get rid of. Just use your paint brush to paint it away. For the most part you are done. If you want your face to be a little transparent, change the opacity of the layer. You'll see Opacity at the top of the layers palette. Change it from 100% to some other value. You can also change the color of your face to the same colors as what's underneath it. Next to opacity you'll see "Normal". Change the filter to "Luminosity" in the drop down menu. It's the last one on the bottom. Your face will now become whatever color that's underneath it. I encourage you to play. I think that's the best thing to do in order to learn photoshop. You'll quickly learn that there are dozens of different ways of doing the same thing. If you don't understand some of my directions please let me know and I'll try to explain better. Hope this helped.
February 18, 2004
|
|
|
Marla Drayton |
|
|
|
|
|
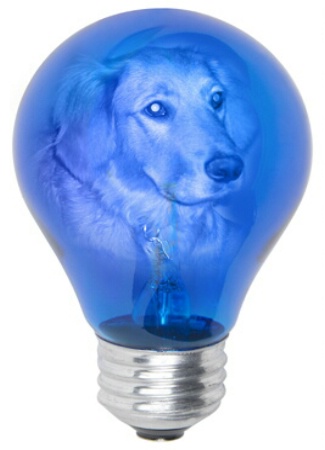
Sample
Sample composite - Dog in a lightbulb
Marla Drayton
|
|
|
|
I'm going to try and upload an example.
February 18, 2004
|
|
|
Nik's Pics |
|
The instructions helped me! Thanks, Marla!
February 20, 2004
|
|
|
|
Log in to respond or ask your own question.
|
