|
Rosie Fodera |
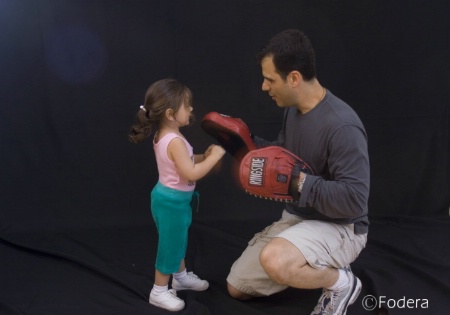
Studio Light Problem
Rosie
|
||||||||||
|
|
|||||||||||
|
Alan N. Marcus |
Hi Rosie, , The blue spot is likely a flare spot. I strongly suggest you procure a lens shade to circumvent light from the side entering the camera’s optical system. A store-bought one will be best but you can test my theory using black construction paper folded into a cone and then snip off the pointy end. The cut creates a cone with openings at both ends. The smaller end is slipped over the lens to form a crude lens shade. Many household items can be substituted. I have used a tin can painted black on the inside. A little imagination and jerry-rigging will solve your flare problem. By the way, flare showed mainly in uniform (mundane) areas like white walls and blue sky and, as you have discovered, mundane black backgrounds. The blue is likely due to internal reflections within the multi-element lens. These lens surfaces are coated with a thin film of fluoride to reduce reflection. The coating thickness determines the color of the reflection. The effect is much like an interference pattern that causes a soap bubble to generate a rainbow effect. You can look this effect up yourself; it falls under the category “Newton’s Rings” and interference patterns. Hope this helps,
|
||||||||||
|
|
|||||||||||
|
Rosie Fodera |
thanks alan. So are you saying that it has nothing to do with the way my back light is set up? If my backlight was set up correctly would I still get this? I have done many studio shots and I only get this every so often. Depending on how my lights are positioned I get it more or less. I thought it was because I didn't have them positioned correctly.
|
||||||||||
|
|
|||||||||||
- Gregory LaGrange Contact Gregory LaGrange Gregory LaGrange's Gallery |
That too. But you might be able to have the light in the same position and get rid of the flare with a hood.
|
||||||||||
|
|
|||||||||||
|
Alan N. Marcus |
Hi again Rosie, As Mr. La Grange has pointed out, repositioning the lights will do the deed but flare like this is difficult to see in viewfinder especially when it presents itself on a black background. Don’t try and dodge the use of a lens hood. Flare and glare is actually present in every optical system and it dilutes contrast and can be devastating. You will gain much more than just the removal of this blue glare. You may just find that the use of a lens shade will bump up your contrast and you will see your work in a new light. Best regards, Alan Marcus
|
||||||||||
|
|
|||||||||||
|
Rosie Fodera |
what is the appropriate way to set up a back light? I have a two B400 Flash units each with an umbrellas. One translucent white umbrella and one silver/white reversible bounce umbrella. Subject is 6 ft from the drop I usually stand around 4 ft from the subject. the main light is positioned higher than the subject on my right side on a 45% angle from me. My back light faces the drop. Also, what is the difference between the two umbrellas? should I be using one two light the drop and one for my main? Thanks so much!!
|
||||||||||
|
|
|||||||||||
|
Rosie Fodera |
Do you use a lens hood all the time in studio photography?
|
||||||||||
|
|
|||||||||||
|
Alan N. Marcus |
Hi again Rosie, First you should know that I am not nor was I ever a photographer. I am now retired. My career spanned more than 50 years. My field was photofinishing and photographic equipment manufacturing. For many years I was a teacher at the Professional Photographers of Americas School for continuing educational (Winona). I taught color print and process; often I would sit in and monitor classes on portraiture. Therefore you should consider my ranting as marginal technical advice. I think classic photographic portraiture is best. While there are no hard fixed rules, consider, photographic portraiture follows in the footsteps of the great portrait painters. The subject is lighted from above to simulate midday sun. Should the light be allowed to come from below a ghostly image is produced, this is how Hollywood creates monsters. Subjects look weird when illuminated by more than one light. Thus we use a main lamp set high and generally off to the side. The height and position of the main is structured based on the subject’s appearance. A long nosed subject is made more agreeable when the main is placed to cast a short nose shadow. Conversely, a short nose is improved by causing the nose shadow to be longer. Round face subject is best served when the main is set off the side. A narrow face is best illuminated by frontal light. These are acquired skills and the reason we need modeling lights. When using a single main light, shadows are cast. Detail in these shadows fail to record thus we need a second light to soften shadows. This second light is called a fill. We must never forget we are filling from the cameras prospective. To accomplish, we place the fill lamp close to the camera lens at lens height. To preserve the one light theme we set the fill subordinate to the main. Generally we adjust this light to arrive at the subject plane reduced in power 50% (1 f/stop less) as compared to the main. This yields a 3:1 lighting ratio. In other words, if we can set the fill to half power, we set both lamps the same distance from the subject. Otherwise, we must adjust the fill to subject distance to control fill intensity. If both main and fill are equal in wattage we set the fill further back as increased distance reduces intensity. If both main and fill are equal wattage, the fill is placed 1.4 times further back. As an example if the main is 50 inches away from the subject and the fill set to 50 x 1.4 = 70 inches. Reducing the fill to ¼ power will give more contrast. This will be a 5:1 ratio. To achieve the fill is set to ¼ power or if main and fill are equal the fill is placed further back. This time we multiply main to subject distance by 2 thus 50 x 2 = 100 inches. Setting the fill at 1/8 power or placing the fill (if equal in wattage to the main) at 2.8 times the main distance 50 x 2.8 = 140 inches gives a 9:1 ratio. 3:1 is best called the “bread and butter” ratio – 5:1 is more contrasty and best for masculine subject – 9:1 is very theatrical. The purpose of the umbrella is to soften light, the whole umbrella acts as the source thus it simulates a “broad” source as opposed to a flood which would result if the umbrella was dismounted. A broad light source yields indistinct shadows. It is much in vogue. A broad light is far less critical as to placement and subject distance. The silvered umbrella reflects more light thus it arrives brighter and more directional. Its light behaves somewhat more like a flood. The silver umbrella is more directional, the white is more diffused. Women are flattered by diffusion, while men generally are enhanced by more directional light. The back light is used to control the shade of the background, moving it closer increases its intensity and the background becomes lighter. Most often the back light is a fixture with no umbrella placed low and behind the subject, directed at the background. A lens hood works wounders. I hope this helps and remember this is marginal technical advice. Best regards,
|
||||||||||
|
|
|||||||||||
|
Debby A. Tabb |
A back light should never be used on a black backdrop unless with a colored gel to produce a arch of color that will accent the scene or object. if you use a backlight with out a colored gel you will get a washed out black, such as a charcol color. when I teach I find it easiest to have everyone picture thier studio like a clock. Background and backlight (if useing one ) at 12:00/ Camera at 6:00 Main at 3:00 and about a foot above the subjects head hieght then angle at a 45 degree angle with the hot spot at the chest. Fill should be at the 7:00 and around lens hieght or just a tad higher. Now this gets you started with traditional Portraiture. when using a backlight it should be at the small of the subjects back not at thier butt. and pointed towards the background. I do hope this helps,this is just a starting place. If you would like a lot more on Portrait Photography the "Studio Photography Threads 1-23 may be of help. Here is the link to Thread #1: http://www.betterphoto.com/forms/QnAdetail.php?threadID=17534 Wishing you hte very best in your ventures,
|
||||||||||
|
|
|||||||||||
|
This old forum is now archived. Use improved Forum here
Report this Thread |
|||||||||||