|
Lavone Vannoy |
Best Skin Tones with Studio Lights In a master lighting guide there is an equation you can use to measure the distance between subject and main light to get optimum skin tones. The equation: measure the longest side of your softbox (outside front panel), then measure the distance from the flash tube (on the inside of softbox) to the front (outside panel)...add the two numbers together and divide by 2. Take THAT number and it is the number of inches your subject should be from the front panel of your softbox. I use continuous lighting (hot lights)...My question is, how can I get my subject that close to hot lights? Should I? I shoot small children most of the time. How can I get them that close without overexposing them? Is this a technique that only strobe users can implement? Thanks for any and ALL advice! Lavone'
|
|||||||||||||
|
|
||||||||||||||
|
W. |
Hi Lavone, you use hotlights to shoot kids? And now you're even considering placing them mere inches from those hotlights? I recommend GOOD insurance coverage! But you can save yourself that cost (and save the kids the fire hazard!), AND get ANY skintone you want, if you shoot flash and RAW. Have fun!
|
|||||||||||||
|
|
||||||||||||||
|
Lavone Vannoy |
FOLMBO!!!! :D That's so funny! If you knew I had very big softboxes (I guess that tid bit would help)and THEN did the equation...it might make better sense to you (It's many FEET not a few or "mere" inches). They are NOT close to them and they DON'T get THAT hot :) (at least MINE don't). I DO shoot in RAW but if you can't achieve a great exposure without RAW then you have issues. You can't rely on RAW and PS to get a great exposure. I don't have hours on end to spend "fixing" every single image from a shoot in PS. I want a great exposure SOOC! Don't you? Your skin tones depend greatly on exposure JUST as sharpness does. :) So do you have any advice on the question? :) Thanks a million! Lavone'
|
|||||||||||||
|
|
||||||||||||||
|
W. |
"if you can't achieve a great exposure without RAW then you have issues" I have to disagree. Dunno what camera you use, but if it can shoot RAW+ then I recommend you do this little eye-opening test: shoot an image in RAW+. Upload 'm to PC. Carefully edit the RAW version and save to JPG. The proof of the pudding is, after all, in the eating. But about your question you mean you have too MUCH light on your subject when you apply that little formula? With hotlights? Well, if you say so. Good luck!
|
|||||||||||||
|
|
||||||||||||||
|
Michelle B. Prince |
I shoot raw+ always but if the high res jpeg looks good then I don't go work on the raw image. Curios about something W. Smith, do you shoot raw and photo shop every image, I just can't imagine having the time to do that, I as well want to get the best possible exposure, white balance and everything to avoid having to spend so much time in photoshop.
|
|||||||||||||
|
|
||||||||||||||
|
Michelle B. Prince |
If there is anyone else that can answer this question I want to know as well. I shoot with alien bee strobes and like my soft boxes very close to the subject, I also meter mostly to shoot at f.8 or f.11 for sharpness, so I keep changing the light output instead of moving the lights back an forth. The "little" formula Smith commented about came from the book Lighting Techniques for High Key Portrait Photography, written by Norman Phillips. It's a very helpful book with many nice examples of light setups. The equation is in reference to getting great skin tones and is something I use myself. We are trying to figure out how this can be applied to someone who uses continuous lights.
|
|||||||||||||
|
|
||||||||||||||
|
W. |
"do you shoot raw and photo shop every image" Every single photo of mine that goes out into the world is post processed. Whether originally RAW, JPG, TIFF, or whatever. To me, image quality is 1) a matter of professional pride, 2) the client expects top quality, so that's what he gets, and 3) he pays for it, so he deserves it. If I would NOT post process my photos, I would feel like one of those photokids with the Polaroid cameras at the entrance of the zoo or the showgrounds with the rack of photos where you can pick up yours on the way out.
|
|||||||||||||
|
|
||||||||||||||
|
W. |
It's like applying lipstick before you go out.
|
|||||||||||||
|
|
||||||||||||||
|
John Wright |
Interesting question... Not sure I can really add too much, but here are my initial thoughts... Light is light and the proper exposure can be measured for the given light (set aside creative license for a moment). I'm not familiar with the referenced equation and I'm not 100% sure of how it's been presented but my feeling is that if you take a properly exposed photo, the skin tones should be exactly as they are in real life. If the equation is being used as an example of how to achieve a specific look when taking a photograph, that may make more sense to me (like shooting for high key, or hollywood type glamour, etc.). As for getting your subjects in place and not over-exposing the photographs, that's part of the challenge of being a photographer and knowing how far you can push exposure before having to reset - either your lights or your subjects. As for shooting RAW or Jpeg... that's a whole other topic really. I've shot (and still shoot) both. It really depends on what I'm shooting for (the end product) and how comfortable I am with the scene, lighting, time, etc. I used to shoot everything in RAW, but I found that the better I learned to shoot, it made little to no difference - RAW vs. jpeg. In either case, I believe when shooting digitally, your exposure lattitude is greatly reduced in any case (+/- .5 exposure stops) and you must do your best to ensure that you get proper exposure in camera. That's my 2 pennies... :-)
|
|||||||||||||
|
|
||||||||||||||
|
David A. Bliss |
I do not want to get into a jpg vs raw argument. It is way too polarized with a lot of misinformation on both sides. I will say that I shoot raw most of the time. I agree with Lavone. WS, you didn't read what was written. Lavone said that he DOES shoot raw, but that when raw is being used to get the proper exposure, then it isn't being done correctly in camera. I believe it is absolutely best to get it as close to perfect in camera as possible. If I have to spend more a minute or two working on the raw file in the bridge, then I don't feel I did a good job with the original shoot.
|
|||||||||||||
|
|
||||||||||||||
|
Lavone Vannoy |
Thank you so much John for your intelligent well thought-out answer! “if you take a properly exposed photo, the skin tones should be exactly as they are in real life.” I totally and completely agree! “If the equation is being used as an example of how to achieve a specific look when taking a photograph, that may make more sense to me (like shooting for high key, or hollywood type glamour, etc.).” It is, the excerpt is from a book Lighting Techniques for High Key Portrait Photography, written by Norman Phillips. “As for getting your subjects in place and not over-exposing the photographs, that's part of the challenge of being a photographer and knowing how far you can push exposure before having to reset - either your lights or your subjects.” That is totally true! I will try this (equation) in my studio and let you know my results. I have continuous lighting, and now I think it is probably less challenging than I thought it might be. “As for shooting RAW or Jpeg... that's a whole other topic really.” I couldn’t have said it better myself!!!!!!!! :D “I used to shoot everything in RAW, but I found that the better I learned to shoot, it made little to no difference - RAW vs. jpeg. In either case, I believe when shooting digitally, your exposure latitude is greatly reduced in any case (+/- .5 exposure stops) and you must do your best to ensure that you get proper exposure in camera.” You hit the nail on the head John, THANK YOU!!!!!!! Lavone'
|
|||||||||||||
|
|
||||||||||||||
|
Lavone Vannoy |
Thank you so very much for your input David!!! “I agree with Lavone. WS, you didn't read what was written. Lavone said that she DOES shoot raw, but that when raw is being used to get the proper exposure, then it isn't being done correctly in camera.” Brilliantly said!!! Shooting for as perfect or spot-on exposure “in camera” should be THE GOAL! “I believe it is absolutely best to get it as close to perfect in camera as possible. If I have to spend more a minute or two working on the raw file in the bridge, then I don't feel I did a good job with the original shoot.” I swear I couldn’t have said it better myself! NO KIDDING! :)
|
|||||||||||||
|
|
||||||||||||||
|
Michelle B. Prince |
David, Hi, I do shoot raw+ all the time but if the jpeg looks great I skip the conversion of the raw image and just go witht the jpeg, so I guess I am using the raw as backup just incase the exposure or white balance is messed up. Do you work every image you want to sell from the raw, even if the jpeg is wonderful. Not asking to be snooty, or critisize anyone for working on imgases, just really want to know. As a business person I have to also consider time spent on projects. I appreciate you comment.
|
|||||||||||||
|
|
||||||||||||||
|
David A. Bliss |
Michelle, to answer your question, it depends. If I am doing a paid portrait shoot, or doing shots for a bands press kit or CD, I will shoot RAW, just to ensure that I have some room for correction if necessary. Honestly, I don't shoot RAW+JPG, just because I don't see the need. If the in camera shot is "perfect" (the situation you said you would use the JPG), then it is only a minute to import the RAW into PS, and then save as a TIFF. It doesn't really take any more time than for me to open the JPG and save it as a TIFF. (BTW, all of my landscapes and nature photos are shot in RAW as well.) When I have (or do) shoot in JPG, I always open it in PS, and then save it as a TIFF, so I will always have the original, untouched file. With RAW this is a given, since you can't save over the RAW file. Canon SLRs shoot at 12 bit RAW,as opposed to 8 bit JPG (expect for the new Mark III, which will shoot at 14 bit RAW). Right now, print technology is at 8 bit, but there are a lot that would argue that working in 16 bit in PS gives a better final image, regardless of the fact that it is printed at 8 bit. Also, if I have the RAW files, then when the print technology for 16 bit becomes common place, I have the 12 bit files to work with. Working in RAW is a misnomer anyway. You shoot in RAW, and then in whatever bridge program you use, make adjustments to the RAW file. Then you import it into PS (or your editing program of choice). Once it has been imported, you are not working in RAW, you are working in the editing program's native file type and have locked all of the RAW settings (basically like working in jpeg at that point). RAW is nice for how easily some things can be adjusted before importing, like exposure, white balance, etc... but there is only one thing that can be adjusted on the RAW file that can't be done in PS... exposure. Once a jpeg has been blown out (pixels saved as white), there isn't anything you can do about it, other than clone over it. In RAW, you have a lot more latitude. Other than that, it can be adjusted in PS, including color correction for incorrect white balance. You just have to know what tools to use. Honestly, I do most of my processing work in PS, and only use RAW for exposure and shadow control, and white balance when I feel it needs it. White balance is easier on the RAW, don't get me wrong ;-) I guess I have rattled on long enough. I hope I have answered your question!
|
|||||||||||||
|
|
||||||||||||||
|
Michelle B. Prince |
Thank you so much David, that is very good information and I appreciate you time in anwering the question asked.
|
|||||||||||||
|
|
||||||||||||||
|
Michelle B. Prince |
I went back and reread an really appreciate you time David, I think the problem that I am having is that I am not doing a great job of converting the raw image, as I and others always prefer the images that I worked from the jpeg and not from the raw. I will get more info on that. I also was spending lots more time than neccessary in raw because I had the auto buttons checked in raw. Susan did help me this morning and now that makes more sense.
|
|||||||||||||
|
|
||||||||||||||
|
David A. Bliss |
Lavone, I don't know if your question was ever really answered, and I'm sorry we kinda hijacked the thread. I can't give you a lot of advice for shooting with hot lights, or if there is a big difference between them and strobes when it comes to skin tone. I set my camera to the white balance of my strobes, and shoot for exposure more than skin tone. If there is an issue with skin tone, I will adjust it in PS. I have a lot more control because I can adjust just the skin and not the overall hue. Even if you get the skin tone exactly as it is in person, that might not "good" skin tone. Mark Feldstein has been a big help for me and many others. He should be able to give you a better answer than what I have provided. Michelle, don't let RAW consume you. Looking at your gallery, it looks like you are doing mostly portrait work. Use the large uncompressed (I know, I know) jpeg, and you will be fine. Truly, unless you are looking to print over 16x20, and even if you want to go larger, if we want to start that argument! ;-) the jpeg will be fine. Just be sure you keep your original jpegs (don't save over them), and save your working copy as a TIFF (no compression for saves). Someone will come in here and argue this, but seriously, if it is working for you, why change because someone says it is the "pro" way of doing it?
|
|||||||||||||
|
|
||||||||||||||
- Gregory LaGrange Contact Gregory LaGrange Gregory LaGrange's Gallery |
Arguing is what the pros do.
|
|||||||||||||
|
|
||||||||||||||
|
- Gregory LaGrange Contact Gregory LaGrange Gregory LaGrange's Gallery |
But allow me to add this before I go outside to play. Actually, allowing has nothing to do with it because I'd add it anyway cause I'm like that. I've never heard of the master's guide to lighting, nor the guy who wrote it, but since you are referring to softboxes, there may well be something to that formula. And I say that because with soft boxes, the size of them, how close you are to them, and the diffusion material distance to the flash tube affect how soft the light is. And that shows up as how broad the highlights are on the people. So being too close to a very large soft box, your highlights will be very broad, with a real soft look. And for skin tones, while the picture may not look bad, you'll have the large white areas from highlights that will hide skin tones. So with finding a good distance, either back up from a large soft box or get closer to a small one, you get that range that gives good soft light, nice broad highlights that smooth out the face. But highlights that don't take over and cover to much surface area. Allowing you to have you skin tones show. And I don't think it's something that strobe users can only do. Maybe just the benefit of the model sitting there for longer periods.
|
|||||||||||||
|
|
||||||||||||||
|
Michelle B. Prince |
Thank you Gregory.
|
|||||||||||||
|
|
||||||||||||||
|
Debby A. Tabb |
David gives some great advise in "....but seriously, if it is working for you, why change because someone says it is the "pro" way of doing it?" The best way to learn lighting is TRULY by playing with the tools you own first! By playing and testing you learn to really think out side the box of "it won't work that way" get to know them and what you can do with them in your studio. Studio Photography Thread #1-#23
|
|||||||||||||
|
|
||||||||||||||
|
Debby A. Tabb |
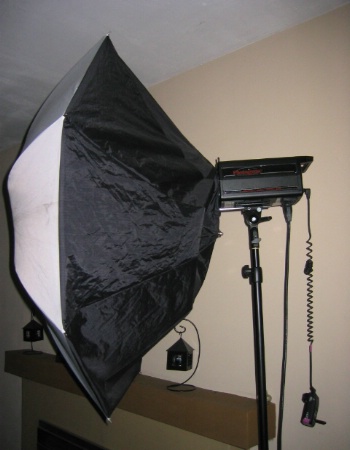
and for those reading getting ready to move into portrait equiptment here are umbrellas as well. Umbrellas have an angle of illumination of about 120 degrees. Soft boxes are much more directional and have an angle of about 40 to 60 degrees.
|
|||||||||||||
|
|
||||||||||||||
|
Michelle B. Prince |
Thank you so much Debby so much for spending the time to help out. I only have small parabolic reflectors and just have one grid to go in them. What is that on the front of yours. I need to get something like that to diffuse. Also, I have always heard that the closer the softbox or umbrella, the softer the light like you said, however everyone lately says thats wrong. could you help us to understand that if you have more time.
|
|||||||||||||
|
|
||||||||||||||
|
Debby A. Tabb |
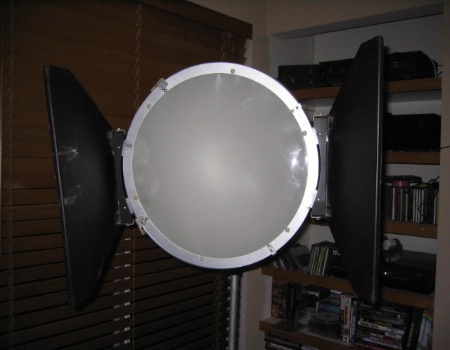
Michelle, The Parabolic reflector is a 20" portrait Reflector seen here: http://www.photogenicpro.com/store/item.php?ITEM_ID=263&DEPARTMENT_ID=77 with a 20" diffuser/gell holder: http://www.photogenicpro.com/store/item.php?ITEM_ID=329&DEPARTMENT_ID=105 and a set of 20" barndoors: http://www.photogenicpro.com/store/item.php?ITEM_ID=279&DEPARTMENT_ID=78 I use Photogenic lighting and supplies but the same products are available with Britek as well and most other companies. Michelle,
|
|||||||||||||
|
|
||||||||||||||
|
John H. Siskin |
I used to use hot lights much of the time. Since my current camera does not tolerate long exposure well. I rarely use them at this point. I did not use soft boxes with hot lights; the heat is a real problem. I did use light panels with hot lights, got very good results. I would think that you couldf use the light panels to achieve a similar quality of light with the hot lights that you had with the strobes. Why did you want to move away from strobe, particularly to work with children? This link: http://www.betterphoto.com/article.php?id=156 has information about building a light panel. Thanks, John Siskin
|
|||||||||||||
|
|
||||||||||||||
|
- Gregory LaGrange Contact Gregory LaGrange Gregory LaGrange's Gallery |
I think that's what she has, not that she's moving away from strobes.
|
|||||||||||||
|
|
||||||||||||||
| Log in to respond or ask your own question. | ||||||||||||||