
Diane M. Black |
|
getting rid of studio shadows
I continue to have a problem when I shoot in the studio. I can't seem to get rid of the silhouette shadow that outlines the individual. I use a fill light on each side and a main light in front.Do I have the person to close to the back ground, should I use an overhead light as well, what should I do!!!??? HELP!!
March 14, 2006
|
|
|
Debby A. Tabb |
|
Diane,
can you tell me what yor using and what you are trying to get?
High Key? or just a reg. Shot?
and what settings are you using?
thanks Debby
March 14, 2006
|
|
|
Christopher A. Vedros |
|
Diane,
Without knowing your full setup, it does sound like your subject is too close to the background.Also, your fill lights may not be strong enough compared to your main light, if they are not filling in the shadow. Chris
March 14, 2006
|
|
|
Mark Feldstein |
|
Yep. It'd really help to know what kind of lights you're using and what their output is. Off hand, however, I'd recommend that you set up your lights one at a time. It could be that your side lights are essentially cross-lighting your subjects and producing kind of a rim light effect or, depending on the angle of your side lights, you may just be setting them up to produce a shadow on the background. If you try a single light set about 40-45 degrees to the subject, employ a modifier, say a softbox and as Chris suggested, moving your subject 6-8 feet away from the background. Then set a fill card to bounce light coming from the main back into your subject. You'll probably see noticeable improvements, including opening up the shadows with reflector fill. Once you get the single light/fill card technique down, if you still feel you need more light, then add one at a time, positioned by turning off the main first, then set your fill light. Try that set-up for awhile, and then, if you REALLY feel you need 3 lights for one person, add the third in the same manner by turning off the first two. Then turn every thing on at the same power levels you had when you set them up and rock and roll. Here's one other suggestion you might find useful. Get a posing stool of some kind, buy a used mannequin or maybe just a styrofoam head for holding wigs. Set them up on the stool and practice moving your lights around so you can see where they start producing background shadows and where adjusting the camera position to the subject will help by not picking them up. This kind of exercise will also help you see the effects of using a fill card rather than a fill light. The effects are much more subtle than using a light. Take it light.
Mark
March 14, 2006
|
|
|
Diane M. Black |
|
Thank you all for your feedback and input. I am using the JTL versalight 160 ws output with 750/e14 halogen bulbs.
So you don't think I need to add an over head light, just try moving my subjects further out from BD and set up lights one at a time 40-45 degree from subject.
March 14, 2006
|
|
|
Diane Dupuis |
|
Try having your subject at least 6 feet away from the backdrop.
March 18, 2006
|
|
|
Daniel Smith |
|
Hello,
I am also having this problem with the same lights. ( JTL versalight 160 )I have moved the lights around and have had no luck and info would be great. Below is a image I shot with my Digital Rebel and these lights. Please let me know what I could do to fix this ;) Thanks,
Dan
March 29, 2006
|
|
|
Daniel Smith |
|
|
|
|
|
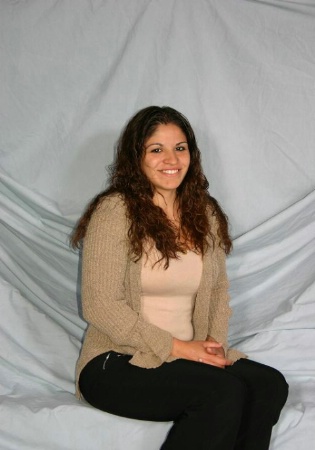
Test Photo
Test PhotoI took this and still have shadows any help would be great. Thanks,
Dan
Daniel Smith
|
|
|
|
Hello,
I am also having this problem with the same lights. ( JTL versalight 160 )I have moved the lights around and have had no luck and info would be great. Below is a image I shot with my Digital Rebel and these lights. Please let me know what I could do to fix this ;) Thanks,
Dan
March 29, 2006
|
|
|
Debby A. Tabb |
|
Hey Dan,
I am sorry you are haveing a hard time.
first off your subject is way to close the background.
move her forward at the least
37 inches, if possible further.
if you have 2 lights use one as a background and one as a backlight.
if you have 3 then use one as a Main a foot higher then the subject pointing down at a 45 degree angle toward the subjects chest.
use the other as a fill at eye level.
use the thrid as a backlight , at the lower back hiegth.
now if you have reflctoers this can be done a few other ways as well.
I hope this helps,
Debby
March 29, 2006
|
|
|
Diane M. Black |
|
Dan I'm glad I'm not the only one fumbling and frustrated with this. However, with the helpful advise I have received from the above photographers I have had much much better results!!
What a great place this has been to help me along my journey!! I hope you will have as good of luck! Diane
March 30, 2006
|
|
|
Alan N. Marcus |
|
Shadow surrounding subject:
On-the-camera flash, acting as the main illuminant without a proper fill lamp, produce harsh lighting. This main lamp position (on axis) causes a shadow close to the subject. If the subject is near a wall, a black, unfilled shadow will appear to rim the subject. A little lighting theory:
Go to the museums and study paintings and photo portraits. Look at the shadows and attempt to figure out how the subject was illuminated i.e. the number and locations of the light sources. You will find a common thread, the illusion of just one light source. You can’t go wrong if you attempt to duplicate this condition. Man, for most of his history, has existed under one light source, the sun. Sun light comes from above. Yes, there are exceptions. However, light from below creates a monster look. Light from two or more directions can be charming, however, first master the one light idea. The main light simulates the sun. It is placed high and generally off to the right or the left. Its position causes shadows to be cast by the nose and other facial features. The face is three dimensional with projections and valleys. Since the photograph is two dimensional, you need these shadows to give an illusion of depth. Without shadows the picture is said to be flat (lacks contrast). Placement and intensity of the main is what you must learn. Wrong usage of the main is the number one mistake made by armature and professional alike. When you use one light to illuminate your portrait, the shadows will tend to go to black, void of detail. The resulting image is said to be too strong (too contrasty). You won’t see this harsh scene when composing because the human eye/brain has 10,000 times more range than the best film or digital. If this were not true, you would need sunglasses when looking at a picture of a sunlit vista. To soften the presentation you need to use a fill lamp. Misplacement and wrong intensity of the fill is the second most common misstate. You are filling shadows from the cameras prospective so the fill is to be placed as close to the lens a possible. Draw an imaginary line from subject to camera and beyond. Place the fill as close to this line as possible without blocking the camera’s view and avoiding shadow that might fall on the subject. The intensity of the fill is kept subordinate to the main. You want the main to be at least twice as bright (1 f-stop) more light than the fill. This produces a 3:1 lighting ratio said to be best (most pleasing and sellable) for portraiture. If the main is four times brighter than the fill (2 f-stops) the ratio is 5:1 which is contrasty. If the main is eight times brighter than the fill (3 f-stops) the ratio is 9:1 which is far more contrasty. I suggest concentrating on 3:1 ratio.
How can you get 3:1 if the fill is just 1 f-stop (2x) weaker than the main?
Suppose both main and fill are equal, and the main is placed so as to illuminate the subject with 100 candles (units) of intensity. Placing the fill further back by a distance 1.4 times the main’s distance causes the light from the fill falls off and when it reaches the subject is will be 50% reduced in intensity. Thus the fill intensity at the subject will now be just 50 candles (units). Now both main and fill illuminate the frontal area of the face (which has no shadows) this area receives 100 units from the main and 50 units from the fill for a grand total of 150 units. However the shadows cast by the main only receive light only from the fill which is illuminating the subject with just 50 units. Thus the ratio is 150:50 or 3:1. This is perfect for film and digital and gives a very pleasing range. Moving the fill further back using the 1.4 multiplier, causes the fill intensity at the subject fall off again by another 50% so now it will be just 25 units. In this case the frontal area receives 100 units from the main and 25 units from the fill. The grand total on the frontal area is 125 units. The shadows, only illumined by the fill receive just 25 units. The ration is 125:25 or 5:1. The 1.4 multiplier is derived from a law in physics known as the “law of the inverse square” You can look it up. Conclusion: Main lamp on axis with camera, unfilled, produces a harsh rimming black shadow. The Main needs to be higher and off to the side. In portraiture, you need to fill the shadows using a fill lamp placed on axis with the camera. The fill is subordinate to the main. Best is a 2x (1 f-stop) difference which works out to 3:1 lighting ratio. Alan Marcus
ammarcus@earthlink.net
April 18, 2006
|
|
|
|
Log in to respond or ask your own question.
|
