
Kimberly J. Whipps |
|
Photoshop Help
|
|
|
|
Family
Kimberly J. Whipps
|
|
|
|
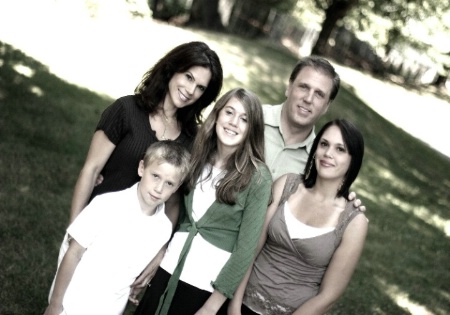
I had a customer request that I take out the splash of sunshine behind her head (she's the mother in the picture) Any ideas on how to do this well and maybe simply if at all possible? I am having trouble because of her hair, it is hard to clone the darker grass around her hair.Any suggestions would be greatly appreciated.
August 27, 2005
|
|
|
BetterPhoto Member |
|
Kimberly, I really don't mind the sunshine. I would understand if it was across her face, but I really think that the picture looks nice how it is. I know that's not much help, but I thought I'd let you know that I like the picture! amber
August 26, 2005
|
|
|
Chauncey R. Huffman |
|
I agree with Amber about the pic looking good as is, however there are a few ways to fix that up a bit. Actually, I'm sure there are a million ways to fix it, but I only know of a few. First of all, if you want to compeltley eliminate it I would either clone stamp it (yes, it takes a lot of time and patience, but you'll find that many things in Photoshop do,) or you can try to slect a large patch of the grass with the selection tool and copy and paste. When you paste the grass it won't look right, you'll have to play around with the transform tools and maybe even the distortion/warp tool (only in CS2.) However, it would be easier to not totally take the sunshine out. Instead just make it a little calmer. You will have to make a selection around the sunlight then you can either pull up levels and pull the highlight slider down. This will only work to a certain extent though before it starts to look odd. You'll ahve to make sure to set your feather to at least 5-10 pixels before you select it or else your edges will be too hard. If that doesn't work then you can possibly use that same selection and move the selection (not the contents of the selection) down to a patch of grass. Once on the grass copy it and paste it to another layer. Reload the selection of the sunshine and lower the opacity, then place the grass layer on top of it and lower it's opacity until it looks somewhat natural. Sorry for rambling. Good luck!
August 26, 2005
|
|
|
Christopher A. Vedros |
|
Kimberly, How'd you get the whole family to lean like that without falling over?? ;-) Chauncey is right, there are several different ways you can approach this. My suggestion is similar to what Chauncey is describing, but maybe a little different. First copy a large section of grass and put it on a layer behind the top layer. You may need to stretch the selection some, or paste some pieces together, so that the grass patch is larger than the sun patch. Go back to the top layer. It should be easy to make a selection of the sunny area with the magic wand tool. Turn on the "continuous" or "contigious" option so that you won't be selecting all the other white areas. Then decrease the opacity of the sunny area to let the grass show through. You may need to zoom in close to her hair to select a few of the "spaces" through her hair that are not connected to the large sunny area. If you keep using the magic wand on continuous, this shouldn't be too hard. I think using tranparency/opacity will work better than adjusting brightness because this is adding some detail to the area where there is none. Good luck.
August 27, 2005
|
|
|
Kimberly J. Whipps |
|
Okay Chris, I hope you are still on. I am doing as instructed and all is going fairly well. But I have gotten to the point of devreasing the opacity of hte selected sunny area, and I don't know how to do that. I am on the original layer and the sun spot is selected, but when I click on layers, opacity is not an option I can change. I am using Photoshop Elements, maybe it doesn't get that specific, I don't know. Appreciate the help thus far.
August 27, 2005
|
|
|
Christopher A. Vedros |
|
Hi Kimberly,
I don't use Photoshop, so I don't know specifically where you would find it. I'm pretty sure Elements can do this, though. It may be called transparency instead of opacity.I use Microsoft Digital Image Pro, it uses transparency, so increasing transparency on a layer would make it disappear. I think PS uses opacity, so decreasing opacity makes a layer disappear. Maybe a PS user can chime in with more specific help on where to find this in Elements.
August 27, 2005
|
|
|
Kimberly J. Whipps |
|
Well there you go Chris...I didn't know there was another Microsoft Digital Image Pro user out there. Everyone uses Photoshop so I asked for Photoshop help. I will try to do the same thing in Image Pro and I will ask for assistance there as needed. Never used layers in Image Pro, are they called layers there? Thanks
August 27, 2005
|
|
|
Christopher A. Vedros |
|
When you make your selection, hit copy then paste. This will put your selection on a new layer. If you display the stack, you'll see your layers shown. Drag a layer down in the stack to put it behind another layer. Click the layer in the stack that you want to adjust, then click Effects, Transparency, Even. This will bring up the slider dialog where you can adjust it. When I'm working on an image like this in Digital Image Pro, I save it as a PNG file until I'm completely finished. That way you won't keep adding more JPEG compression if you save and go back to it later. Also, all the layers will be preserved in a PNG. I'll try to keep checking back, but I need to go out and pick up the patio furniture. We have a hurricane coming. Later,
Chris
August 27, 2005
|
|
|
Michelle Ross |
|
Hi Kimberly .. . When you make your selection of the highlighted portion go to layers>new>copy layer. . . this will put only the selected portion in a new layer. . . you can then adjust the opacity by using the tool palette to the right and entering a percent . . . however. . . I'm not sure this will accomplish what you are wanting . . . I think you will need to actually go to the box to the left of the opacity and select multiply . . this will darken the area . . . and THEN adjust the opacity .. . so it blends. . .
August 27, 2005
|
|
|
Pete H |
|
"Masking" to the rescue. :) Indeed cloning is one way to accomplish this task, however, doing a selection is probably not the best way..at least as far as I can see in your photo...There does not seem to be enough average continuous grass to "burn" in. Try this" Using your mask tool, mask the bright sun area..use a very soft brush when you get close to the subjects hair line. Now select "inverse." This will select the bright area you just masked.
Next; begin to "build up" the bright area with "cloning." Choose areas where the densities are similar..This appears to be about 10 or so area selections.
Almost done: "Feather" the selection..perhaps 10 may work.
Now; "deselect" If you see any margins where the mask area was, you can clean that up with a soft brush using clone and a lower opacity. Yep..It is a fair amount of work...20 mins perhaps.
If you wish, you may email me the original photo. It's hard to tell what technique to use w/o seeing it in Adobe at 200%.
Masking by the way is a superior way to make selections when edges are not well defined as Masking is very soft. Hope that helps a little and I didn't confuse you more. Pete PS: Always do a duplicate copy to work on...Never the original.
August 31, 2005
|
|
|
Pat Worster |
|
Hi Kimberely I also use Digital Image Pro and I also have PSE2.0 ,I feel the digitai Image is much more user friendly. I really like the picture the way it is. Pat
September 01, 2005
|
|
|
|
Log in to respond or ask your own question.
|
