|
Barbara J. Johnson |
Jewelry Photography Help
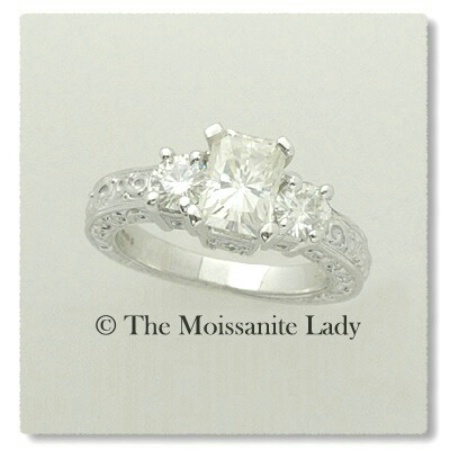
We sell jewelry. We recently purchased a Nikon D70 with a micro lens and ring light. We have tried a photo tent, sheets, moving the ring light around, blue lights, etc., to get the pictures perfect. We need to get the background of the pictures very white, but not have the rings/jewelry washed out. When we get the ring to look perfect, the background is blue or grey ... HELP!!! Blessings! Barbara
|
|||||||||||||
|
|
||||||||||||||
|
Bob Cammarata |
Have you tried a copy-stand type setup? With two incandescent light sources hitting the ring at 45-degree angles (as close to the subject as you can get without them being in the frame), the ring and background would be illuminated equally. As long as your background is white, and your white balance setting is correct, it should look like the photo you are trying to emulate.
|
|||||||||||||
|
|
||||||||||||||
|
Wilson H. Valentin |
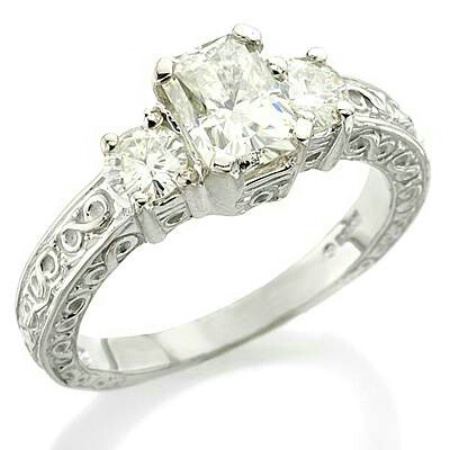
Hi Barbara, There is no equipment that will get your background white white white or R 255 G 255 B 255 when placing the eye dropper to get the color values. Not even if you get a $30,000 Digital back. A light tent is good with light strobes and the rest is Photoshop using curves and levels and manually erasing the background to get it white. it's very hard and many photographers hate it. the ring you posted which you got from a site is ok but I see yellow on it plus the shadow is a distraction, at least for my art director. E-mail me with any other question you may have.
|
|||||||||||||
|
|
||||||||||||||
|
Barbara J. Johnson |
What about those "domes"...they seem to be very pricey and I would feel more comfortable if we had someone tell us that it was worth the money to get one.
|
|||||||||||||
|
|
||||||||||||||
|
Raquel S. |
I know this sounds quite cheesy and cheap, but you can make your own dome with a plastic gallon milk jug. Cut out the bottom and then cut a hole in the top big enough to fit your lens. The semi-opaque plastic works quite well to diffuse and soften your light and your jewelry should easily fit underneath. It's a cheap trick and it's easily disposable/replaceable.
|
|||||||||||||
|
|
||||||||||||||
|
Barbara J. Johnson |
Raquel ... you're a genius! We will surely try that out! THANK YOU for your idea! Blessings! Barbara
|
|||||||||||||
|
|
||||||||||||||
|
Charles Cooper |
Try using the Exposure Compensation setting, add a stop, take a picture, remove the EC, take another picture and merge them. The picture with the extra stop will give you the nice white background, and the second one (without the EC) will give you a correctly exposed ring. coop
|
|||||||||||||
|
|
||||||||||||||
|
Wilson H. Valentin |
The following image was taken using "The Box."
|
|||||||||||||
|
|
||||||||||||||
|
DAVID PAQUIN |
Hi Barbara, Why not a black background...use a black matt board or velvet or anyting black....I have also used white but found white will sometimes reflect a tint depending on the lighting used and the color of the object...also you can use black sewing thread to hang objects and have them floating in space. I have used black velvet for silver and gold coins and a couple of diamonds and really like the diamonds on black velvet and using a star effect filter... so try it out and have fun...David.
|
|||||||||||||
|
|
||||||||||||||
|
Vince Warwick |
I would use Photoshop elements 2 or 3 and correct the background that way. If you get the perfect shot on the item then make the background pure white. Bit of a cheat I know but you only have to worry about getting the item spot on rather than all the image. Vince
|
|||||||||||||
|
|
||||||||||||||
- Shirley D. Cross-Taylor Contact Shirley D. Cross-Taylor Shirley D. Cross-Taylor's Gallery |
I have photographed hand-crafted jewelry for artists wanting to be juried into art fairs and galleries. I am on a tight budget, but for translucent items I have had excellent results with the following setup: Two studio lights in softboxes and white foamcore as a base with a 3-panel freestanding backdrop of white foamcore set close behind the jewelry to reflect the light back into the stones. A clear glass or plastic base to set rings on or to hang earrings on works well. I've even used the base of an upside-down crystal goblet with good results, and the background stays pure white.
|
|||||||||||||
|
|
||||||||||||||
|
Joseph Rutsky |
If you want a really white background, light the jewelry as you normally would, but add a light against the white background so that it is one to two stops brighter than the foreground. For underneath the item, you can use a white piece of plexiglass with a light underneath it. When you expose for the jewelry, you will really overexpose the background and it will come out really white.
|
|||||||||||||
|
|
||||||||||||||
|
Cathy P. Austin |
Here's a link to an example setup that seems to work. I think that you can improvise with the lighting equipment.
|
|||||||||||||
|
|
||||||||||||||
|
Barbara J. Johnson |
Well, we broke down and bought the MK Photo E Box Plus...it was not cheap, that's for sure! But, as you can see, it definately delivers the goods! Thanks for all the help!
|
|||||||||||||
|
|
||||||||||||||
|
Vikas Sodhani |
Hi Barbara, I recently purchased a Nikon D70 with the 60mm micro lens and am having a very difficult time getting clear pictures of my ring with both the bottom of the shank and the top of the ring in focus. My setup is as follows: I have a light tent with the ring inside the tent. The camera is angled inside the tent to get an angled birds eye view very similar to your pictures. I have tried almost everything from varying the Fstop/apperature and shutter speed in manual mode to trying different distances/angles between the camera and the ring. For some reason the top of the ring always is slightly out of focus. I am seeing better results from my Olympus 5050 w/macro lens which doesnt make much sense. Any help you can give me would be greatly appreciated. Thanks! -vikas-
|
|||||||||||||
|
|
||||||||||||||
|
Barbara J. Johnson |
Hello! Well...we find that we get the best results when the ring is not fully focused...we were running into the very same problem but when we started allowing for the back of the ring to be slightly out of focus...that is when we saw the stone become very clear and crisp. Just a little hint...the photo tent just did not work for us...we tried and tried but it ended up being a waste of money. We are loving the results we are getting with the Photo EBox...well worth the money! Now we have no use for the ring light...since the ebox has all the light you need. Blessings!
|
|||||||||||||
|
|
||||||||||||||
|
Charles Cooper |
Keep in mind that the 60mm micro lens on the D70 has an effective focal length of about 90mm, so you are using a mild telephoto. For this reason, the depth of field is quite shallow. You might need to increase the light available. ...don't want to be rude, but how much photography experience (with a camera in manual mode) do you have? coop
|
|||||||||||||
|
|
||||||||||||||
|
Barbara J. Johnson |
If you are asking me, Coop...we have absolutely NADA, ZERO, ZILCH experience...we are learning as we go...reading the manual if you can believe that...it's really my husband who takes the shots and I look them over and tell him if I like it or not. It sure makes it easy when you can connect the camera to the laptop and shoot the pics that way and play with the settings to get the pic just right...very nice. We use the auto focus on ours...Blessings! Barbara<><
|
|||||||||||||
|
|
||||||||||||||
|
Vikas Sodhani |
Thanks Barabara. Hmm.. well ive tried putting the back of the ring out of focus also and tried most other manual focusing options and still ended up with un-crisp pictures. When you said the photo-tent did not work for you are you talking about it not giving you solid white backgrounds? I'm solving that by using photoshop to cut out my images and then pasting them on to a pure white background. I am having some issues with lighting in that it doesnt seem to be even at times. I figure I will first get the focusing right. Charles could the amount of light be causing my pictures to be blurry. I am actually in the same boat as Barbara. I am learning as I go along, but I feel as if I have learned quite a bit at this point. I am using the camera in manual focus mode and adjust the speed to what the meter tells me to on the camera (i have also tried a slew of apperature settings and speeds thinking that was my problem). my ISO is set to 200 and Ive also looked at the depth of field preview which is of course dark and a bit hard to judge from. here are some pics that I took. these are some of my better ones. im also adding a picture from my olympus camera where I used exposure adjustment to adjust for the dull pictures I was getting. the photos are in this directory:
|
|||||||||||||
|
|
||||||||||||||
|
Barbara J. Johnson |
When we were using the tent...we were also using blue lights to help with the lighting issues...it worked okay...but we ended up with the grey/blue background in the pictures. It was just too time consuming for my husband to cut out the picture and put it on a white background...so we ditched the tent and got the box. The only lighting we are using now are the lights that are in the box...no flash. And that has made a real difference as well. You're right...your Olympus picture looks really good...we went through that as well...our little point and shoot digital was giving us better results than the Nikon...but it really has taken trial and error in learing the camera(Nikon) and what it can and can't do. Blessings!
|
|||||||||||||
|
|
||||||||||||||
|
Charles Cooper |
Hi Barbara and Vikas, Well, here's a quickie course in photography! There are three things to concern yourself with. ISO (we used to call this "film speed"), shutter speed and the aperture (f stop). They all inter-relate to deliver a good photo. The problem is that when you are dealing with "close ups", the inter-relationships become very crucial, so there is little margin for error. The trick in close up photography is to get a large depth of field (that is, you usually want to have as much of the item to be photographed in focus). This is done by setting the f stop to a large number. This will cut down on the light entering the lens, but it will increase the area in focus. Using a longer shutter speed will increase the amount of light hitting the "film", so you can still get a good photo. If you can't get a good photo, you can increase the available light or change the ISO. This is one of the great advantages of digital. If you are using ISO 200, try setting it to 400, or even higher. This will increase the sensitivity of the camera; it's like swapping a slow film for a faster one in a traditional camera. You need to juggle these three things until you get the image you want. So: ISO - lower number, less sensitivity, but higher quality image. On the D70 you should be able to go to 800 without any problems unless you are printing the image 8 x 10 or larger.
|
|||||||||||||
|
|
||||||||||||||
|
Charles Cooper |
Another thought... You might try adjusting the exposure compensation to "make the whites whiter". You have a largely white background, which fools the camera into underexposing the shot. Camera meters try to get good results by comparing the scene with a hypothetical average. This works out to an 18% grey. Most of the time this works out fine. Shooting with a bright white background (snow, beach sand or the background of a lightbox when photographing a ring) throws the average way off. Try adjusting the Exposure Compensation to +1.0 or +1.3. You could even start at +0.3 and work your way up. After all, digital film is free! coop
|
|||||||||||||
|
|
||||||||||||||
|
Michael H. Cothran |
May I also offer some assistance? First, the original image that you liked appears to have been shot on a sheet of white plexiglas. Coupled with a nice light tent, Plexiglas will give you the cleanest white surface. It also gives you a little bit of a reflection, as you can see in your image. Now, this is also possible to do in PS or other editing softwares, so no one really knows if this image is original or enhanced - and it doesn't really matter - the end result is all that matters. You can also add a light underneath your jewelry. This will give you a pure white with no reflection. Be careful here not to use too much light, as it will wash out the bottom of your ring. Experiment first. Finally, you can shoot the ring, then separate it from the original background in PS again, and then paste it to a white background. I shoot jewelry commercially, and have just set up my first website. I have two samples posted, if you'd like to view. I use a gradient gray background that I created in Photoshop, then separate the jewelry, paste it to the new background, and add a drop shadow. You could do the same thing, only with a white background (the drop shadow would not be necessary with white). The web address is - www.mhcphoto.net>Jury Services>Image Gallery. Then select Zeke&Marty or Carolyn Conniff. Good Luck. Michael H. Cothran
|
|||||||||||||
|
|
||||||||||||||
|
Barbara J. Johnson |
Michael...fantastic pictures! I love the shading of the grey background of the pictures! What wonderful information...I've printed everything out...I personally can't thank all of ya'll enough for the great advice!
|
|||||||||||||
|
|
||||||||||||||
|
Vikas Sodhani |
Thank you all for your help. I still havent captured the photographs that ive been looking for. I know its possible.. and have figured a couple of things out. I realized my D70 wasnt giving me clear shots with good depth of field (ie the bottom of the ring was not coming in clear) because of the micro lens I was using. I switched out the micro for the lens that comes with D70 kit and added close-up lenses (ie for maginification) to the end. I managed to get much better pictures. The bottom is now much clearer but the top part of the ring is still fuzzy. its close but still not as good as my olympus point and shoot. im giving up on the nikon now. I was told by some that other cameras with close up lenses have produced great pictures. I may try that in the future. does this sound logical? any suggestions are welcome. thanks so much.
|
|||||||||||||
|
|
||||||||||||||
|
Charles Cooper |
Try more light, it will allow you to get a greater depth of field... Focus on the shiny bits (the top, that's what people look at, right?), and leave the back of the ring to go fuzzy if necessary. Think of it as a portrait. In portitature it's important to get the eyes in focus, as that's where we look. If the eyes are not sharp, everything falls apart. I would think that the 'shiny bits' of a ring are like the eyes. Are the "close up lenses" the type that screw on the front of the lense like a filter? Most of those are of iffy optical quality and may not be doing you any great favours... Honestly, I'd keep the micro/macro lens, try more light, change the ISO to a higher number and work for a greater depth of field. Focus on the shiny bits and see how it goes. Best of luck. coop
|
|||||||||||||
|
|
||||||||||||||
| Log in to respond or ask your own question. | ||||||||||||||