
Theresa C. Tyree |
|
How to Sharpen a Blurry Photo
Does anyone know if it is possible to sharpen a blurry photo in either PSE4 or CS2? Is there an action or tool that can do it in one step? If not, does anyone know where I can find a step-by-step tutorial on how to sharpen a blurry photo? Thanks!
January 24, 2007
|
|
|
Ibarionex R. Perello |
|
Unfortunately, there is not much you can do to sharpen a blurry image even in Photoshop. You can apply sharpening to an image, but it's just adds edge sharpening to an image, but doesn't come close to what it should have looked like.
The only way to ensure a good shot is to achieve at the moment of exposure. This requires solidly holding the camera, having a reasonably fast shutter speed and, if necessary, using a tripod. It will always come down to camera handling to ensure a sharp result.
January 24, 2007
|
|
|
Ariel Lepor |
|
And you need proper focus. If you zoom in too much, this can be difficult. Shooting at the sweet spot (about two stops smaller than the widest aperture your lens offers) also helps. It even helps to use a remote or a timed delay exposure. Sure you can sharpen in Photoshop, but as Ibarionex said, you can only go so far. I use Helicon Filter and it is actually quiet good at "adding" detail to an image.
January 29, 2007
|
|
|
Allan L. Whitehead |
|
Theresa - I use product called 'Focus Magic' by 'Aclaim Software' (http://www.focusmagic.com/) and also use CS 2 and their product works wonders. It's a 'plug-in' for Photoshop in CS 2 and they have an evaluation period so you may try it out. Its available for both Mac (which I use) and the Windows platforms. Try it out - Allan Whitehead
January 30, 2007
|
|
|
sander-martijn |
|
While what the others said are true, there are some things you can do already built into CS2 (I dhave never used PSE but I imagine some of these are in there too) that can improve the appearance of your images - sometimes dramatically.
I frequently use the unsharp mask (under filters, sharpen) - while it sounds like that will make the images less sharp, if used properly it can result in a sharper appearance. There's no set rule to it but I have a guideline I start with every time. Zoom in on an important area of the photo before going into the filter so you can see the effect well in preview. start with the Amount at 150%, the radius at 0.6 pixels (sometimes 0.7 pixels works as well but anything larger than that can give undesirable results), and between 0 and 2 Threshold. That's a good starting point - from there play around with these numbers (radius least of all) and see what gives you the best result without adding too many other artifacts or making thinner lines (such as hair) look too jaggedy. One last note on this filter - make this the last thing you do to your photos as it does alter the data a lot more than you may be able to see visibly. By the way this technique does wonders on images that appear sharp already too - brings a new level of crispness to the image.
Some people have luck with Smart Sharpen as well, so you can try that out but I still have better luck with the unsharp mask. If what's making your photo appear blurry is something other than camera shake or subject motion, then there are some other tools to explore - in particular, try the various filters under "Noise". My camera sometimes likes to add digital garbage to low-light long exposures and those filters, especially Dust & Scratches can improve those images pretty dramatically sometimes.
With all of these and any other photoshop techniques, mileage will vary - I always undo and redo several times to make sure my "improvements" didn't actually make it worse in some other way in the process. Nothing works for every case. And of course, you can never "fix" a bad image in Photoshop - but you can help it along a bit.
January 30, 2007
|
|
|
Theresa C. Tyree |
|
Wow! I am overwhelmed and humbled by the amount of knowledge here! I will study what everyone's said and see if I can come up with an improved picture. Thanks so much to everyone!
January 30, 2007
|
|
|
Scott Stulberg |
|
Hey there.One other thing to think about. Many times the entire photograph isn't blurry...but maybe small areas like the eyes. You can selective sharpen these areas by using a layer mask and "make" it look like the photo was much sharper. In my Photoshop Yips and Tricks class, I show how to bring back the focus somewhat in the eyes, when the eyes look like they are a little out of focus. You can use Unsharp Mask or Smart Sharpen to do this. Smart Sharpen is actually Adobe's newer and better sharpening tool, with more options. Learning how to selective sharpen parts of a photo is invaluable!!Hope that helped!
January 30, 2007
|
|
|
Michael Henry |
|
Try the unsharp mask in CS2 but try this tip first. first open and edit your photo to how you want it then convert it to a LAB photo in Mode>lab. This converts the photo. Look at your palettes and open the channels palette and click on lightness under the LAB. Now use the unsharp mask as described earlier. In lightness you may be able to sharpen more, ie up to 150% but play around to see what suits. Once happy click out of lightness back to full LAB and thus full colour and convert back to RGB in Mode to be able to save. Sounds long but it's not and is very effective.
January 30, 2007
|
|
|
good bye |
|
Hi Theresa, Sometimes I think out of focus looks neat. Look at my M&M picture, the m&m in the backround is out of focus. I didn't plan that, but my family thinks it looks artistic.
January 30, 2007
|
|
|
Peter R. Hammer |
|
There is also another few tricks which can work well in some images. One is to duplicate the layer and do a filter find edges on the top layer and add a mask to get rid of unwanted details in the edges and blend it in. Another is to use one of the artistic filters like paint daubs. You can also zoom right in close on important details like eyes and just paint or clone at the pixel level to clean up edges. It is time consuming but very effective on samll areas.
January 30, 2007
|
|
|
Klaus W. Lange |
|
|
|
|
|
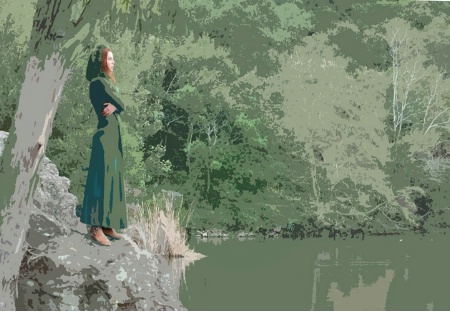
Emerald Lake
Here was a mess, when the focus was sharp on the trees in the background, but soft in the foreground. I ran the background through the cutout filter, and afterwards dropped in the face and the shoes to keep the narrative alive.
Klaus W. Lange
|
|
|
|
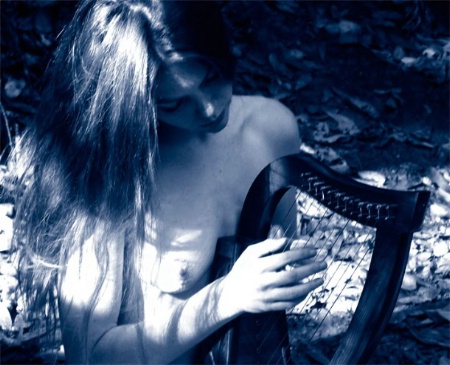
Sylph with harp
Another rescue mission from a fuzzy shot. I cropped out what was unworkable, turned the rest into a duotone, and came away with a CD cover.
Klaus W. Lange
|
|
|
|
Sometimes when life or photography hands us lemons, we can always make lemonade. While I agree that an unsharp photo is pretty much messed up, you could crop it in such a way that the composition resemples a painting. Then add a drybrush or pallet knife filter, and voilà, 50% of the time you'll have a decent frameable image, which may not win prizes, but it may help in keeping a memory of a special moment alive.
January 31, 2007
|
|
|
Michael Foerster |
|
Hi Theresa, I just wanted to second Allan's answer concerning focusmagic. It's a bit old but it's the only program I know of, that has a remote chance of correcting a "blurred" picture. All sharpening filters only sharpen "soft" images and do nothing about blurred ones. Here is a link to a picture I corrected with focusmagic: http://www.fotocommunity.de/pc/pc/mypics/617035/display/6883345 The "original" can be found here: http://carpediem.fotopic.net/p38234796.html but use the "Full Size" option under the picture to see the obvious blurring, especially in the flash/lens highlights, the body frame and face/teeth...
I think this example shows the kind of fixes possible with one click in no time at all... Hope this helps
Cheers,
Michael
February 01, 2007
|
|
|
Michael Foerster |
|
Hi again, to keep it simple I uploaded corrected/uncorrected versions to: http://carpediem.fotopic.net/c974759.html Bye again
Michael
February 01, 2007
|
|
|
Who Me? |
|
nice porn there Klaus ;}
February 01, 2007
|
|
|
|
Log in to respond or ask your own question.
|
