Verve

Uploaded: June 23, 2007 18:08:59

Description

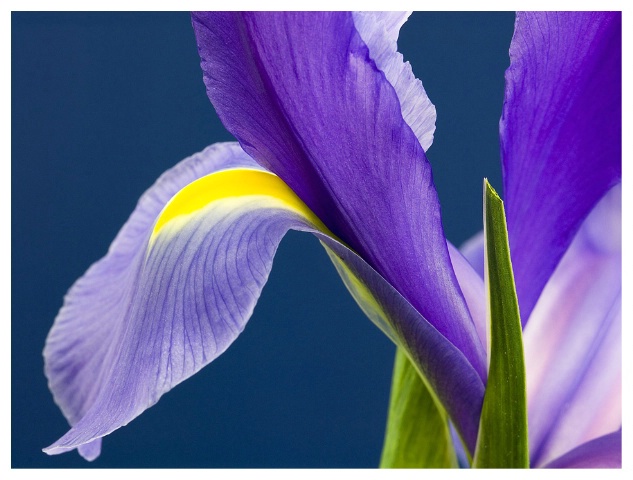
Macro study of an Iris.

Shot aperture priority utilising Nikkor Micro 105 @f14, 1/400 sec. Set up within and lit by my home made light tent.

Comments

Ken Grooms June 23, 2007

Wow! Now we're talkin! I want this shot in my gallery. B/g really sets it off, Graham. Congrats! #679152

Sam Britt June 23, 2007

Beautiful color, great composition, Graham. I like the dark blue background also. #4429523

Graham J. Weiss June 23, 2007

G'day guys. Thank you!
hehe Ken, send me your credit card details :D
Hi Sam, thank you for your terrific feedback also. I've set this Iris up in my light tent (which I've built myself). Along with my forks (Tines Like These), I started utilizing powerful day-balanced fluorescent lighting, from both sides of the flower and additionally from on top. I've also started to use interesting coloured cards as my backdrops. And because the tent is quite deep, I can creatively blur the backdrop and have just its colour to compliment the subject. I now have tons of coloured cards, metallic cards, silver and gold reflective and gel cellophane sheets to experiment with!
Thanks again! #4429555

Bunny Snow July 04, 2007

From what did you make the light tent?
PVC pipe? What material for the fabric? Please share details, as I'm very interested.

Thanks for sharing. #4471661

Rich Collins July 04, 2007

Graham. now that's dramatic light tent shooting. I'll bet you are having a lot of fun. To tail in on Bunny's inquiry, where do you find all the colored cards? I ask this as I have just finished building my lightbox out of cardboard, just a large box really. Lined the upper half with aluminum foil & then placed a large curved piece of felixible foam, about 1/4" so my flourescents can beam through from the back opening as backlighting. But I want to find some of those colored cards. Are they just poster board? #4471980

Lindley Johnson level-classic July 04, 2007

This is a wonderful image, Graham, with excellent color and lighting! I, too, am interested in more details about your light tent, backgrounds, etc. Congratulations on your feature in today's PhotoFlash. #4472145

Bunny Snow July 04, 2007

Rich, I had a lightbox that I made out of foam core. White foam core will stand if it's taped or coupled together with L brackets (which my husband made for me), but it was really tricky keeping them from falling over. I would think that using PVC piping including joints would work better with some sort of white fabric sewn or stapled over the piping. Just guessing.

I did find that foam core came in large pieces and in a variety of colors at a local arts and crafts store. To give an example of the colors, see:
http://www.artsupply.com/foamcore/colorfoamcore.htm

Playing around with them, I learned that black absorbs light and when used on one side of a box created 'wanted' shadows. I took that knowledge into the field and photographed my daughter and her husband on a snowy, white-out day near an old charred barn where tonality and volume was created by adding shadows to the faces of my subjects.

Foam core is a great learning tool! #4472154

Rich Collins July 04, 2007

Thanks Bunny. Gawd I love creative people. Black for creating shadows. Nice. I'm going to the craft store today. #4472176

Graham J. Weiss July 04, 2007

G'day guys.

Thanks heaps for your coming in to have a look and a comment. Great buzz to be included alongside such talent in today's Photoflash. Thanks BP! :)

Bunny, Rich and Lindley, thanks for asking about the tent. It's been a labour of love I can assure you lol.

There's many ways you can go about building a light tent (be mindful what you search for online in terms of instructions, as a lightbox is really the opaque lit-from-below work table that slide shooters of old used to scan and still do - negs, transparencies and slides with a loupe) I decided to build something sturdy rather than buy something 'foldable' because I primarily wanted to build it to house my ice projects and any I saw in stores had small openings for which to place items...usually for say, jewellery or perfume type sized subjects. My ice projects can be as big as 11" x 8" x 4" and I wanted something to open without hindering access, particularly as I like to shoot these things from all angles and like to move them about quite a bit. On to the light tent itself. The size of the tent is really pretty large, it's dimensions are 24" deep x 21" high x 16.5" wide or about as big as my old apartment :) Frame is constructed from tubular aluminium for strength = nice and rigid, but light. You could easily use pvc pipe. The frame is aluminium tubing (found in craft, hardware or modelling shops and is 1cm app. the entire cube is made from aluminium. I've utilised similar sized timber doweling to strengthen up the base and to stop from flexing, and also to ensure it sits flat. I've used a combination of plastic 'T' and 'elbow' joiners from a drip irrigation system to join the aluminium together. This allows the tubing to rotate before I lock into place. To be honest, I love the aluminium for strength; however, given my time again, I'd use pvc pipe and the correct sized joiners. Now the material. I wanted the material dense enough to provide flat, even, opaque lighting. I found standard (white) shower curtain to be just the product. It just needed to be cut to size. ripstop nylon may have been an even better choice as it is less dense and would allow less powerful lighting to be used. In any case my shower curtain is just about perfect. I literally cut to size, one sheet to wrap lengthwise around the frame and another width wise - two sheets basically. I then fastened using little self adhesive Velcro dots. Unfortunately they unselfadhese after a while lol and my plan is simply to staple each dot. that way I figure I can unwrap and throw in the wash or tub to clean if necessary. I've included a pic of my tent with some gorgeous Dancing lady Orchids for you to look at. I'll pop the lighting and card/backdrop related answers in a second response below. #4472350

Graham J. Weiss July 04, 2007

The lighting itself is pretty specific, without going to the trouble of buying purpose built lights at AU$1200 a pop. I've found some fluorescent work/flood lights which have replaceable globes and popped in the maximum specified for that lamp. These are day balanced - between 5000k and 6500k - so are similar to sunlight or camera flash, a tad cooler in fact. Each globe is rated at 28 watts which translates to about 140 watt of incandescent light with the benefit that they run fairly coolly. Two sit on one side of the tent and one sits on aluminium bracing on the top to eliminate or ease out any shadows. The other I have is a 48 watt flouro worklight that sits on the other side of the tent and is equal to about 250 watts of incandescent light. I feel this last claim is a bit enthusiastic lol...in any case I can customise the light by removing (or moving) a light if I need, and create intended shadow if I wish. Why so bright? Well I'd like to eliminate movement as much as possible and in a sense produce enough light to illuminate to allow a faster shutter speed (for say insects or dripping water if I wish), or allow more saturation of colour if I chose a longer shutter speed.

Rich, the cards is an interesting question. Having made my tent large enough (to camp in lol) I was able to slip practically any sized card in the back, given that I could mount my D200 close and the power of the 105 micro lens is quite awesome, I could pop the card or backdrop anywhere in the tent and even curve it for dramatically soft backdrops. So in a sense I have all sorts of sized papers, card and cellophane now. A2 sized card wraps neatly around the back of the tent, allowing light from all sides. ‘Tines Like These’, is produced with my forks actually sitting on my D200 box with a patch of the green card on the box and the rest of the card wrapped around the back of the tent. The large aperture meant these separate pieces of card would melt together, which they did. ‘Verve’ used a 12 " x 12" cardstock (approx 230 gsm) which is quite sturdy. This is typically scrapbookers or craft type paper. And comes in hundreds of colours. I imagine most craft stores would stock this sort of paper. You can use literally anything from gold and silver reflective A2 sized stock, which does interesting things with the light, to coloured cellophane which I'm experimenting with now, placing outside the tent for tinting. I also use terrific metallic tissue paper, and have even used the paper that my unsuspecting flowers have come wrapped in! Yes I agree with Bunny too, in that the darker colours tend to absorb the light leading to creative darker backgrounds. Really appreciate your interest and questions guys (always welcome) Cheers :) #4472439

Robin R. August 09, 2007

The subject, color and detail make for a beautiful image. #4624660

Rich Collins August 09, 2007

Wow thanks Graham. That's a lot of detail. I think the pvc-type frame is what I'll try first along with some white, sheer cloth I bought recently. Do you mind listing for us the actual bulb manufacturere & model numbers, or website? Even if I don't I buy this particular brand I can learn from what you are using with such great effects.

And then the paper. I guess I'll just head to a craft store & pick up what I think will make for a few shots for flowers, insects or this fall's dried look background enhancement with bokeh.

Can't thank you enough Graham. This is the soruce of creativity this sharing of ideas & methods.

#4626001

Graham J. Weiss August 10, 2007

Hi Robin. Thank you!

G'day Rich. You're quite welcome. Sounds like what you wish to set up would work well. From personal experience, I find the the light throw seems adequate and even with the lamps up close to the light diffusing material; But here's a word of caution...whilst the fluoro lamps run a good deal more coolly than incandescent globes do, they can still heat up, 'specially if there is little or no airflow, so make sure the material, whether cotton or plastic or whatever you use, doesn't rest against the lamp element/globe itself. To facilitate airflow I took the front glass covers off all the lamps but one (the highest wattage one) and that one blew the other day from overheating. My material isn't going to stray into the lamp as it'a wrapped around my fame, but you still have to be careful.

You'll find probably many lamp manufacturers in the States that manufacture or distribute suitable globes. Philips, GE, and Osram come to mind. None of those brands had lamps (that I could readily find) rated higher than 23 watts which just seemed fairly weak through my material (would depend on the density of your material. I'm hesitant to provide model numbers, because I don't know if my globes (made for Australian voltages - we're 240 volt over here) would suit your differing voltage?

As a guide, Philips lighting website is terrific (I included web sites but they caused errors when I attempted to post them) I can mail you these if you like.

In my case, I currently use a brand called Nelson, from Nelson Industries who make globes including the 48 watt one I used described earlier, unsure if they have a distributor in the USA. The lamp housing itself is from a company called Fairway who distribute in Australia also. Both the Nelson and Fairway brands are manufactured in China. In my research for you, I located a lighting store in the USA called Lighting Universe...lol if they don't have something, who would?

I'd highly recommend you pop into a good quality photographic store over there (I personally have sourced products from Hunts Photographic for example) perhaps to see how any existing photographic light source is set up, what lamps they use etc and if globes are available over the counter...In any case, I think it important to mention I use solely Compact Fluorescent Lamps (or CFL) for my set up. Using incandescent globes could cause (at the very least) fumes or melting of the lamp housing if constructed of plastic, or at worst a fire. There'd be appropriate warnings on your product of course.

Hopefully all of that info is enough to go by. Give me a yell if there's anything else you'd like to know and let me know how you get on. I'll be looking for at least an editor's first pick or a winner from you from now on, of course ;) #4628738

Rich Collins August 10, 2007

I am sure I'll stick with fluorescents as I experiment, but might need to eventually pick up a monolight. Thanks for the warning about flame standards & voltage compatability. I'll take a look at both of your sources & make sure I mention my location & the higher watts ratings in CFL bulbs.

Grahm some of us here, won't respond & others like yourself, offer a world of information. This is really appreciated by those of us who hope to learn. I can't thank you enough.

One more question: Do you ever find that removing your material & using a light modifier such as a so-called softbox is beneficial? And if so what kind of material do they use/ I'm going to look that one up.

So thanks again Graham. A very big help. #4628922

Bunny Snow August 10, 2007

Not Graham here. But when you have the light going through the fabric in the light box, it is my understanding that the light box actually becomes a modifier, such as a softbox. That is, depending upon the opacity of the fabric.

Really sheer fabric would not work that way, and would need more modification like a white umbrella or a soft box. But a good opaque fabric would act like a soft box. At least that's what I've learned.

Bunny #4629725

Rich Collins August 10, 2007

Thanks Bunny. I see what you mean as a diffuser.

Maybe I used the right term & maybe I didn't, it's just that when I hold this material up to light I can see shapes through it. I'll have a chance to try it out tomorrow. Really I only wanted a softening effect. Maybe I can fold over 2 layers just for a trial run. But if my experiment doesn't work well, I'll just head over to the fabric store & try something a bit more opaque as you suggest. #4630471

Bunny Snow August 11, 2007

Rich,

It is also my understand that the further the flash is from the fabric, the greater the modification. If the light is right next to the fabric, the light is still very strongly focused. Light further away becomes more diffused. An example is the sun coming through the clouds, or indirect light coming through a window.

Softboxes have white fabric in front and dark fabric on the sides. This focuses the light in that it does not disperse sideways. But the fabric in front is very opaque. And, at the same time the light is various distances away from the fabric. The larger the softbox, I would guesstimate the greater the dispersion rate. #4635027

Bunny Snow August 11, 2007

Softboxes are designed to soften light by spreading out or enlarging the light-emitting surface. But, better than a small softbox is a larger softbox made from aluminum or pvc piping, assuming you can back away with your lights from the fabric thus creating a more diffused light source.

I recall seeing images of sets in John Siskin's gallery. He's the lighting expert at BP.com, so I understand.

http://tinyurl.com/2lgdsm
http://tinyurl.com/2qxyho

This one may be the best set up for large diffusers.
http://tinyurl.com/2nbgtl
The portrait which was taken with these larger diffusers is at:
http://tinyurl.com/3yd7th

Hope this helps.

Bunny #4635094

Graham J. Weiss August 12, 2007

Hey again Rich.

Great compliment, thank you. I'll try to keep my response to less than 3000 characters this time lol... When information is free flowing, I reckon it then all comes to just about the talents of the photographer, especially in a competitive environment.

Thanks also for your input too Bunny.

You raise an interesting point with mention of a softbox. My understanding of a softbox is the type of diffuser you'd slip over your stand-alone flash unit (or speedlight) The theory is still the same in that it diffuses the outgoing light to the point of 'softening' it. The effect here is to spread, or 'spray' the light (usually quite a powerful light) across the subject which would traditionally be a person in a portrait type environment. I don't think a softbox would be used (as often) in an 'object' type shoot, as in my flowers or forks.

You'd expect that any light source bright enough to warrant softening with a soft box or diffuser material would get quite hot. So to answer your question about removing my material, in my case I'd need to slip my material then, over my lights, which would mask the light and effect quite significantly, which 'd not be practical. So no I don't feel I need to remove the material at all, and haven't yet. But yes, you're on to something, which is the material itself. Many professional light tents are constructed from opaque plastic which I guess are made of a consistent density to compliment professional lighting set ups, and vice versa. In a home built one, it's a matter of getting the 'right stuff' as it were. So far I've only used nylon 'shower curtain' material. Ripstop nylon is said to be good too, this is the stuff they make jackets and parkas out of. the beauty of the materials I've mentioned is that you can slip them (or stretch them) over a frame. To give an idea of how transparent some of these things are, I was wandering home from work the other night in the rain, and happened to look up to see a treet light through the membrane of my umbrella. Made me think of this conversation actually lol (oh and another photo idea) I'm not suggesting you erect your umbrella up inside 9cos that's bad luck, right?) but you can guage what sort of density of material you'd need. #4635345

Graham J. Weiss August 12, 2007

Hey again Rich.

Great compliment, thank you. When information is free flowing, I reckon it then all just comes to the talents of the photographer, especially in a competitive environment.

Thanks also for your input too Bunny.

You raise an interesting point with mention of a softbox. My understanding of a softbox is the type of diffuser you'd slip over your stand-alone flash unit (or speedlight) The theory is still the same in that it diffuses the outgoing light to the point of 'softening' it. The effect here is to spread, or 'spray' the light (usually quite a powerful light) across the subject which would traditionally be a person in a portrait type environment. I don't think a softbox would be used (as often) in an 'object' type shoot, as in my flowers or forks.

You'd expect that any light source bright enough to warrant softening with a soft box or diffuser material would get quite hot. So to answer your question about removing my material, in my case I'd need to slip my material then, over my lights, which would mask the light and effect quite significantly, which 'd not be practical. So no I don't feel I need to remove the material at all, and haven't yet. But yes, you're on to something, which is the material itself. Many professional light tents are constructed from opaque plastic which I guess are made of a consistent density to compliment professional lighting set ups, and vice versa. In a home built one, it's a matter of getting the 'right stuff' as it were. So far I've only used nylon 'shower curtain' material. Ripstop nylon is said to be good too, this is the stuff they make jackets and parkas out of. the beauty of the materials I've mentioned is that you can slip them (or stretch them) over a frame. To give an idea of how transparent some of these things are, I was wandering home from work the other night in the rain, and happened to look up to see a treet light through the membrane of my umbrella. Made me think of this conversation actually lol (oh and another photo idea) I'm not suggesting you erect your umbrella up inside (cos that's bad luck, right?) but you can guage what sort of density of material you'd need. #4635347

Rich Collins August 12, 2007

Thanks Bunny. I took a look at your links. Funy thing is they revert to BP pages. I guess when you have a Deluxe site you can hotlink from your other sites. I'll look around a little more & see if I can locate the actual material these companies who charge so much for the softboxes & diffuser panels. They have to buy it somewhere too. I just thought I could keep the costs down.

Thanks :] #4637766

Bunny Snow August 12, 2007

The pages revert to BP sites because that's where they were initially found, I don't think this has anything to do with having a Deluxe gallery. I just knew from past experience where to go because I had contacted this person about a similar item and he gave me his web pages where the information was posted, presumably for his classes.

I hope to take John's classes some day when I can walk better than I can right now.

I used softboxes and umbrellas for many of my shoots, be they people and animals, silverware, crystal, pottery, or whatever I did in the past.

But, that was because I did not know about these methods which John has used himself or with his students at BP.com.

Good luck with your learning experience.

Bunny #4638419

Vladan D. Djordjevic December 20, 2007

Fantastic color, lighting, detail, composition! Congratulations! Vladan #5237385

To discuss, first log in or sign up (buttons are at top center of page).

Get Constructive Critiques

Sign up for an interactive online photography course to get critiques on your photos.


Did You Know?

Discussions by Category: You can view photo discussions on various themes in the Community > Photo Discussions section of the site.

BetterPhoto Websites: If you see an orange website link directly under the photographer's name, it's totally okay. It's not spam. The reason: BetterPhoto is the one that offers these personal photography websites. We are supporting our clients with those links.

Unavailable EXIF: If there is no other information but 'Unavailable' in the EXIF (meaning no EXIF data exists with the photo), the 'Unavailable' blurb is not displayed. If there is any info, it shows. Many photos have the EXIF stripped out when people modify the image and resave it, before uploading.


The following truth is one of the core philosophies of BetterPhoto:

I hear, I forget.
I see, I remember.
I do, I understand.

You learn by doing. Take your next online photography class.

BetterPhoto.com Photo Contest Finalist


Copyright for this photo belongs solely to Graham J. Weiss.
Images may not be copied, downloaded, or used in any way without the expressed, written permission of the photographer.
Log in to follow or message this photographer or report this photo.