|
Heidi E. Zimmerman |
How do I lower the light in my softboxes I just recently purchased my first set of soft boxes. Before, I shot just with shoot through umbrellas. I cannot figure out though how to change the power on my soft boxes. All of my photos are pure white. I have tried everything with my camera. I shoot with a Canon XTi and with a 28-80 lens for my studio shots. I have tried pointing the boxes in different directions - i.e., ceiling, wall, ground - and nothing is working ... everything is white white white. And it doesn't help that my soft boxes didn't come with any type of instruction as well. Any help that anyone can give, I would appreciate it. The room I am shooting in is 13x21. Thanks!
|
||||||||||
|
|
|||||||||||
|
Mark Feldstein |
Reducing the power of your lights themselves is what you need to do. Assuming you're using hot lights and there isn't a rheostat of some kind to do that with, you can build one using a proper sized dimmer switch available in a hardware store or at an electrical supply house. If you're using strobes, read those instructions for reducing power output. In the alternative, you could modify the softboxes themselves by adding some kind of non-reflective liner and placing modifiers on the front of the box. You can make barndoors, scrims, gobos and other things to reduce output out of screen, cardboard and fireproof materials (assuming again, you're using hot lights). Or buy them. Take it light ;>)
|
||||||||||
|
|
|||||||||||
|
Heidi E. Zimmerman |
Thanks Mark. Unfortunatly, my softboxes didn't come with instructions what so ever, I did contact the company to tell them that, so hopefully I will hear something from them soon. Yes, there are no dials what so ever to turn them down, it is on or off and then strobe, so right now I am kinda stuck. I guess I spent a lot of money without researching them sooner.
|
||||||||||
|
|
|||||||||||
|
Alan N. Marcus |
Hi Heidi, "Hot Lights" is a synonym for tungsten lamps. Tungsten bulbs can be dimmed using a resistor or transformer or the like ... however, as dimming occurs, the color temperature of the lamps moves towards the red end of the spectrum. This method is OK for black and white, but adds complications for color photography. Florescent lamps are more difficult, nevertheless specialized dimmers are available. That being said I genuinely doubt that the brightness of the lights are the culprit. Washed-out images are likely due to overexposure. Likely this is due to camera setting rather than lamp brilliance. I tell you this with confidence because artificial light is feeble by comparison to sunlight. And I can tell you with confidence that your camera is capable of handling a sunlight vista. First, assuming your soft-box lighting is too bright; you can adjust light energy using distance. Measure subject-to-lamp distance, multiply by 1.4; this calculates a revised distance equal to a 50% drop in brilliance. You can repeat this again and again till you run out of room. Conversely multiplying by 0.7 computes a revised distance that doubles the light energy on the subject. Don’t like math, use a light meter to make these adjustments, your camera has a good one built-in. What’s the problem? You need a refresher course in camera settings. It wouldn’t hurt to shoot a bracketed series in manual mode. How about setting the ISO at 100. Set the shutter speed at 1/125 sec. Shoot a series using every f/stop. Repeat at different shutter speeds. Wouldn’t hurt to include a gray card (18% target) in the scene. Wouldn’t hurt if you shot in full auto mode. Try one lamp at 8 feet from subject placed high and off to the side. Place one lamp along side the camera at 11 feet from the camera. Shoot at f/8 at 1/125 sec. examine the results and adjust f/number and shutter speed for optimum. Best of luck, Alan Marcus (marginal technical gobbledygook)
|
||||||||||
|
|
|||||||||||
|
Bruce A. Dart |
Heidi, Alan has given you the alternate method to replace a flash meter -- a good, old fashioned bracket test. Your strobes, through a soft box, are many times more powerful than available light. Setting your camera with auto setting just doesn't compensate and gives you white overexposure. One of the finest lighting instructors ever, the late Dean Collins, pointed out that two f stops more light on any color (he was talking background as opposed to subject but it holds true here) will render it white with detail; one more stop (8 times the amount of light with three stops) with make it white without detail. Your situation likely has three or more stops difference. Using strobes it is advantageous to have a flash meter to get you in the ballpark but the tests that Alan described will do the same. You must be in MANUAL MODE or the camera will try to base its exposure on the "modeling lights" or ambient light in the room. It doesn't have time to adjust when the flash goes off to oversimplify. Setting lights at equal power then placing them at "f-stops" away from a subject (main light at 8 feet; fill light at 11 feet, etc) with one F-stop difference will give you a pleasing ratio for most subjects in portraiture. John Siskin has a very good tutorial on this as well. Once you get close in exposure you can adjust the power output and/or your camera settings to fine tune. Remember too, that soft boxes (in order to maintain their soft quality of light) are designed to work fairly close to your subject. The farther away they get, the more "specular" the light becomes and the effect looks more like other types of lighting. Bruce
|
||||||||||
|
|
|||||||||||
|
Alan N. Marcus |
Bruce is right on target. We can adjust exposure and lighting ratio by position adjustment lamp-to-subject distance. The secret is; light follows a rule called the law of the inverse square. No need to go into detail on this subject but: Increasing lamp-to-subject distant results in a reduced amount of light on the subject. The best technique is to adjust in 1 f/stop increments. Measure lamp-to-subject distance and write down. Use the below listed multiplying or dividing factor (both yield the same answer. The multiplying factors: Main high to simulate afternoon sun – Fill at lens height near camera. To decrease brightness move lamp away from subject. To increase brightness move lamp closer to subject Lighting ratio: (based on equal power Main and Fill lamps) Alan Marcus
|
||||||||||
|
|
|||||||||||
|
Heidi E. Zimmerman |
Thank you all so much for your help, I will defiantly be trying all of this tonight, hopefully something will help. Thank you again.
|
||||||||||
|
|
|||||||||||
|
Roy Blinston |
As already mentioned above, here are my methods: 1. Move your lights away from the subject (try different distances) 2. Try different settings on your camera (always be in "manual mode" not auto). 3. Flash synchronisation will work on most cameras up to say 250th sec. Try different shutter speeds and different apertures (and make notes as you go). 4. I have strobes myself and generally shoot at ISO 100, 250th sec at f8 (lights are about 8-10 feet from the subject). 5. Pure white white white pics may mean your lights are too close to subject... and/or aperture is too open ... and/or shutter speed is too slow .... and/or ISO is too high. 6. Vary all the above and eventually you will find the right setting for your situation. It has nothing to do with the softboxes. Most strobe lights have built-in dimmer switches. If yours do not then moving the lights away from the subject will have the same effect.
|
||||||||||
|
|
|||||||||||
|
Bruce A. Dart |
Heidi, All of us talked around the subject, making assumptions. Roy is right. The amount of light has nothing to do with the softboxes but with the strobes or whatever light source is behind them. THAT is where the adjustments are. The softbox, like an umbrella, is a light modifier and changes the quality of the light, not the quantity. Power, distance, and in some cases the size of the room, all impact the light on the subject. In a small room, the light bouncing off a near wall and consequently back onto the subject is what the late Peter Nicastro in his lighting course called the "unseen secondary." We often forget that the light doesn't "stop" at the subject but bounces around. It can add as much as another half an f-stop of light to your subject. In a large room, the light seems to dissipate more -- perhaps because the unseen secondary is no longer present. As with all things photographic...Test! Test! Test!! Good luck. Bruce
|
||||||||||
|
|
|||||||||||
|
Robert A. Staub, Jr |
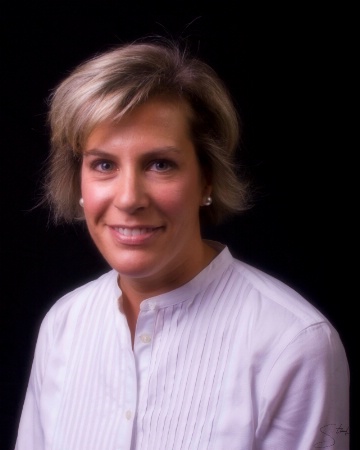
There are a lot of great answers here. . . I am curious. . . 1) what type of light heads are you using, brand, watt/second, etc. . . 2)how were you shooting before? What settings were you at when you shot through the umbrellas? I assume you had good results with those setting? Your soft boxes should work fine with those same settings, given that all else is the same. . . Besides changing from umbrella to soft box, what did you change? If I were you, I would purchase a lightmeter, instead of taking hundreds of test pictures. I have one that I use for every portrait session. The settings do not change much from sitting to sitting. . .I have the Polaris flash meter. It is inexpensive and invaluable. I connect it to my flash head using the PC sync cable that came with the head, hold it on front of my subject facing the flash head, and take a few test readings from the face, shoulders, and chest. For example: For children sitting posed, I set the softbox about two feet away from the subjects face at a 45degree angle from center line between the camera and subject, and above their eyes, with the front of the soft box angled down to "point" at the nose. The flash head is set at about 3/4 power, it is a 300 watt/s head. Camera is set at 100 ISO, shutter speed at 125. The aperature usually comes back between f/11 and f/16. You must be in Manual mode. For sitting posed adults, the softbox is a little higher and a little further back, therefore the f/stop usually is between f/8 and f/11. If I use a secondary fill light, then I use the meter to test the light from that flash head, ensuring that it is indeed asking for a stop or two less than the main light or even, depending what effect I want for fill. Buy a flashmeter, save some time. You have already made some investment in lights and light modifiers, a meter will be very helpful in nailing your settings. Even though I know that using the same setup I will need the same camera settings, it is a nice safety. . .and clients think it looks like I know what I am doing! Also, kids like to pop the flash and see the readings and that can be a kind of ice breaker. here is an example of a softbox shot the way that I mentioned above. Take it easy.
|
||||||||||
|
|
|||||||||||
|
This old forum is now archived. Use improved Forum here
Report this Thread |
|||||||||||